Unit - 5
Server Side Scripting Languages
PHP is a server-side scripting language was designed for web development but also used as a general-purpose programming language. It was created by Rasmus Lerdorf in 1994 developed to PHP/FI 2.0. In 1997 up to PHP 3.0 with a new parser engine was designed by Zeev Suraski and Andi Gutmans. Current version is PHP 5. The full form of PHP is “Hypertext Preprocessor”. The extension of PHP programming language is ".php π.
PHP code may be written into HTML or HTML5 markup or it can be used in combination with various web template systems, web content management systems and web frameworks. It is usually processed by a PHP interpreter implemented as a module in the web server or as a Common Gateway Interface (CGI) executable. The results of the interpreted and executed PHP code can be combined by the web server software, which may be any type of data, including images, with the generated web page. PHP code may also be executed with a command-line interface (CLI) and can be used to implement standalone graphical applications.
PHP can be used to manage dynamic content, databases, session tracking, even build entire e-Commerce sites. It is integrated with a number of popular databases, including Oracle, MySQL, PostgreSQL, Sybase, Informix, and Microsoft SQL Server. PHP is agreeably fast in its execution, especially when compiled as an Apache module on the UNIX side. The MySQL server, once started, can execute even very compound queries with huge result sets in record-setting time. PHP supports a large number of major protocols such as POP3, IMAP, and LDAP.
PHP is a recursive acronym for "PHP: Hypertext Preprocessor".
PHP is an HTML-enabled server-side scripting language. It's used to manage dynamic content, databases, and session monitoring, as well as to create full e-commerce websites.
MySQL, PostgreSQL, Oracle, Sybase, Informix, and Microsoft SQL Server are just a few of the databases it supports.
PHP runs quite quickly, especially when compiled as an Apache module on the Unix side. Once started, the MySQL server executes even the most sophisticated queries with large result sets in record time.
POP3, IMAP, and LDAP are just a few of the important protocols that PHP supports. PHP4 included support for Java and distributed object architectures (COM and CORBA), allowing for the first time n-tier programming.
Key takeaway
PHP code may be written into HTML or HTML5 markup or it can be used in combination with various web template systems, web content management systems and web frameworks. It is usually processed by a PHP interpreter implemented as a module in the web server or as a Common Gateway Interface (CGI) executable
● PHP performs file functions on a system i.e. create, open, read, write and close.
● PHP can handle forms, i.e. gather data from files, save data to a file, through email you can send data, return data to the user.
● It can also be used to add, delete and modify elements within your database through PHP.
● Access cookies variables and set cookies.
● Using PHP, you can restrict users to access some pages of your website.
● It can encrypt data.
Five important characteristics make PHP’s practical nature possible:
1. Familiarity
2. Simplicity
3. Efficiency
4. Security
5. Flexibility
1. Familiarity
Programmers from several backgrounds will find themselves already familiar to the PHP language. Many of the language’s constructs are borrowed from C and Perl and in many cases PHP code is almost identical from that found in the typical C or Pascal program. This minimizes the learning of PHP significantly.
2. Simplicity
There is no need to include libraries, special compilation directives, or anything of the sort even if PHP code consists of IOOO lines or single line. The PHP engine simply begins executing the code after the first escape sequence (). If the code is correct syntactically, it will be executed exactly as it is displayed.
3. Efficiency
Efficiency is a significant consideration for working in a multiuser environment such as the WWW. PHP 4.0 introduced resource allocation mechanisms and more pronounced support for object-oriented programming in addition to session management features. For eliminating unnecessary memory allocation reference counting has also been introduced in the current version.
4. Security
PHP provides a flexible and efficient set of security to the programmers and administrators with safeguards. These safeguards can be divided into two frames of reference: system level and application level.
Operators are the mathematical, string, comparison, and logical commands such as plus, minus, multiply, and divide. PHP looks a lot like plain arithmetic; for instance, the following statement outputs 8:
Echo 6 + 2;
Before moving on to learn what PHP can do for you, take a moment to leam about the various operators it provides.
1. Arithmetic Operators
Arithmetic operators do what you would expect. They are used to perform mathematics. You can use them for the main four operations (plus, minus, times, and divide) as well as to find a modulus (the remainder after a division) and to increment or decrement a value.
Operator | Name | Example |
+ | Addition | $a + $b |
- | Subtraction | $a - $b |
* | Multiplication | $a * $b |
/ | Division | $a / $b |
% | Modulus | $a % $b |
** | Exponentiation | $a ** $b |
2. Assignment Operators
These operators are used to assign values to variables. They start with the very simple = and move on to +=, -=, and so on. The operator += adds the value on the right side to the variable on the left, instead of totally replacing the value on the left. Thus, if Scount starts with the value 5, the statement,
Scount + = 1; sets Scount to 6, just like the more familiar assignment statement:
Scount = Scount + 1;
Operator | Name | Example |
= | Assign | $a = $b |
+= | Add then Assign | $a += $b |
-= | Subtract then Assign | $a -= $b |
*= | Multiply then Assign | $a *= $b |
/= | Divide then Assign (quotient) | $a /= $b |
%= | Divide then Assign (remainder) | $a %= $b |
3. Comparison Operators
Comparison operators are generally used inside a construct such as an if statement in which you need to compare two items. For example, you may wish to know whether a variable you have been incrementing has reached a specific value, or whether another variable is less than a set value, and so on.
Operator | Name | Example |
== | Equal | $a == $b |
=== | Identical | $a === $b |
!== | Not identical | $a !== $b |
!= | Not equal | $a != $b |
<> | Not equal | $a <> $b |
< | Less than | $a < $b |
> | Greater than | $a > $b |
<= | Less than or equal to | $a <= $b |
>= | Greater than or equal to | $a >= $b |
<=> | Spaceship | $a <=>$b |
4. Logical Operators
Logical operator is generally used to combine the results of two of the comparison operators. A logical operator can also be input to another logical operator: “If the time is later than 12 p.m. And earlier than 2 p.m., or if the smell of a roast is permeating the hallway and there are plates on the table.” As a rule, if something has a TRUE or FALSE value, it can be input to a logical operator. A logical operator takes two true-or-false inputs and produces a true-or-false result. Syntax in php is; if ($hour > 12 && Shour > 14) dolunch();
Operator | Name | Example |
And | And | $a and $b |
Or | Or | $a or $b |
Xor | Xor | $a xor $b |
! | Not | ! $a |
&& | And | $a && $b |
|| | Or | $a || $b |
Note that && is usually interchangeable with and; the same is true for ∣∣ and or. But and and or have a lower precedence, so in some cases, you may need extra parentheses to force the required precedence. On the other hand, there are times when only and or or are acceptable, as in the following statement, which uses an or operator:
Shtml = file_get_contents($site) or die( , ‘Can't Access: Ssite”);
Variable Assignment
The symbol“=” is used to assign a value to a variable like variable = value, or to reassign the value to another variable like variable = variable.
There are also a couple of other assignment operators that you will find useful. For example,
Sa = a+ 10;
Which tells the PHP parser to add the value on the right (in this instance, the value 10) to the variable $x. Likewise, we could subtract as follows:
Sa = a- 10;
Variable Incrementing and Decrementing
Adding or subtracting 1 is such a common operation that PHP provides special operators for it. You can use one of the following in place of the += and -= operators:
++Sa;
-Sb;
In conjunction with a test (if statement), you could use the following code:
If (++$a== 10) echo $a;
This tells PHP to first increment the value of $a and then test whether it has the value 10; if it does, output its value. But you can also require PHP to increment (or, in the following example, decrement) a variable after it has tested the value, like this:
If ($b- ==0) echo $b;
Which gives a different result. Suppose $b starts out as 0 before the statement is executed. The comparison will return a TRUE result, but $b will be set to -1 after the comparison is made. So what will the echo statement display: 0 or -1?. The echo statement will display the result -1, because $b was decremented right after it was accessed in the if statement, and before the echo statement.
Strings
They are sequences of characters, like ”PHP supports string operations”. Following are valid examples of string Sstringl = ”Hai”;
Sstring2 = ’Hello’;
Sstring3 = ’’Text”;
Sstring4 = ””; ∕∕ a string with zero characters
Singly quoted strings are treated almost literally, whereas doubly quoted strings replace variables
With their values as well as specially interpreting certain character sequences.
<7php
Svariable = ’’name”;
Sliterally = ’My Svariable is not Anand!’;
Print(Sliterally);
Print ”<br>”;
Sliterally = ”My Svariable is Anand!”;
Print(Sliterally);
?>
This will produce following result -
My Svariable is not Anand
My name is Anand
String Concatenation
String concatenation uses the period (.) to append one string of characters to another. The simplest way to do this is as follows:
Echo “You have ”. Smsgs. ” messages.”;
Assuming that the variable Smsgs is set to the value 5, the output from this line of code will be the following:
You have 5 messages.
Just as you can add a value to a numeric variable with the += operator, you can append one string to another using .=, like this: Sbulletin .= Snewsflash;
In this case, if Sbulletin contains a news bulletin and Snewsflash has a news flash, the command
Appends the news flash to the news bulletin so that Sbulletin now comprises both strings of text.
String Types
PHP supports two types of strings that are denoted by the type of quotation mark that you use. If you wish to assign a literal string, preserving the exact contents, you should use the single quotation mark (apostrophe), like this:
Sinfo = ’Preface variables with a S like this: S variable’;
In this case, every character within the single-quoted string is assigned to Sinfo. If you had used double quotes, PHP would have attempted to evaluate Svariable as a variable. On the other hand, when you want to include the value of a variable inside a string, you do so by using double-quoted strings:
Echo “This week Scount people have viewed your profile”;
As you will realize, this syntax also offers a simpler form of concatenation in which you don’t need to use a period, or close and reopen quotes, to append one string to another. This is called variable substitution, and you will notice some applications using it extensively and others not using it at all.
Escaping Characters
Sometimes a string needs to contain characters with special meanings that might be interpreted incorrectly. For example, the following line of code will not work, because the second quotation mark encountered in the word spelling’s will tell the PHP parser that the string end has been reached. Consequently, the rest of the line will be rejected as an error: Stext = ’My spelling’s
Atroshus , ; ∕∕ Erroneous syntax
To correct this, you can add a backslash directly before the offending quotation mark to tell PHP to treat the character literally and not to interpret it:
Stext = ’My spelling∖ , s still atroshus , ;
And you can perform this trick in almost all situations in which PHP would otherwise return an error by trying to interpret a character. For example, the following double-quoted string will be correctly assigned:
Stext = ’’She wrote upon it, ∖”Retum to sender∖ n . n ;
Additionally, you can use escape characters to insert various special characters into strings such as tabs, newlines, and carriage returns. These are represented, as you might guess, by ∖t, ∖n, and ∖r. Here is an example using tabs to lay out a heading; it is included here merely to illustrate escapes, because in web pages there are always better ways to do layout:
Sheading = n Date∖tName∖tPayment n ;
These special backslash-preceded characters work only in double-quoted strings. In single quoted strings, the preceding string would be displayed with the ugly ∖t sequences instead of tabs. Within single-quoted strings, only the escaped apostrophe (V) and escaped backslash itself (W) are recognized as escaped characters.
Key takeaway
Operators are the mathematical, string, comparison, and logical commands such as plus, minus, multiply, and divide.
PHP includes a range of functions for controlling what and when content is transmitted to the browser. Output control is the term for this.
Any of the following sources can provide output:
● echo, print, printf, print_r... And other similar functions and statements
● Notices, warnings and errors from PHP
● Any content outside of the tags
Before providing the output to the user, PHP and the backend on which it is operating may buffer it.
Note that the output control functions can construct as many output buffers as they want. The program's output is captured in output buffers. Each successive output buffer is stacked on top of the previous ones, and whatever output it generates is caught by the buffer below it. Because the output control functions only handle the topmost buffer, the topmost buffer must be removed before the buffers may be controlled.
PHP Output Control Functions
Method | Function |
Flush() | Attempts to send content from the system's output buffer to the browser |
Ob_clean() | Deletes all of the content from the topmost output buffer |
Ob_end_clean() | Deletes the topmost output buffer and all of its contents |
Ob_end_flush() | Deletes the topmost output buffer and outputs its contents |
Ob_flush() | Outputs the contents of the topmost output buffer and clears the buffer |
Ob_get_clean() | Returns all of the contents of the topmost output buffer and clears the buffer |
Ob_get_contents() | Returns the contents of the topmost output buffer |
Ob_get_flush() | Outputs and returns the contents of the topmost output buffer and then deletes the buffer |
Ob_get_length() | Returns the number of bytes of data that are in the topmost output buffer |
Ob_get_level() | Returns a number indicating how many output buffers are on the stack |
Ob_get_status() | Returns information about the output buffers |
Ob_gzhandler() | Used as a callback function for ob_start() to compress the contents of the buffer when sending it to the browser |
Ob_implicit_flush() | Turns implicit flushing on or off |
Ob_list_handlers() | Returns an array of callback function names that are being used by the topmost output buffer |
Ob_start() | Creates a new output buffer and adds it to the top of the stack |
Output_add_rewrite_var() | Used to append query string parameters to any URL in the output |
Output_reset_rewrite_vars() | Removes all variables added by output_add_rewrite_var() |
Key takeaway
PHP includes a range of functions for controlling what and when content is transmitted to the browser. Output control is the term for this.
PHP Conditional Statements
Conditional statements are used to perform different actions based on different conditions.
In PHP we have the following conditional statements:
● if statement - executes some code if one condition is true
● if...else statement - executes some code if a condition is true and another code if that condition is false
● if...elseif....else statement - executes different codes for more than two conditions
● switch statement - selects one of many blocks of code to be executed
1. PHP - The if Statement
The if statement executes some code if one condition is true.
Syntax
If (condition) {
Code to be executed if condition is true;
}
The actions to take when an if condition is TRUE are generally placed inside curly braces, { }.
However, you can ignore the braces if you have only a single statement to execute.
In Example, imagine that it is the end of the month and all your bills have been paid, so you are performing some bank account maintenance.
Example : An if statement with curly braces
<?php
If ($bank_balance < 100)
{
Smoney= 1000;
SbankJoalance += Smoney;
}
?>
In this example, you are checking your balance to see whether it is less than 100 dollars (or whatever your currency is). If so, you pay yourself 1,000 dollars and then add it to the balance.
If the bank balance is 100 dollars or greater, the conditional statements are ignored and program flow skips to the next line (not shown).
2. PHP - The if...else Statement
Sometimes when a conditional is not TRUE, you may not want to continue on to the main program code immediately but might wish to do something else instead. This is where the else statement comes in.
With an if-else statement, the first conditional statement is executed if the condition is TRUE. But if it’s FALSE, the second one is executed.
Syntax:
If (condition) {
Code to be executed if condition is true;
} else {
Code to be executed if condition is false;
}
Example : An if...else statement with curly braces
<7php
If ($bank_balance < 100)
{
Smoney= 1000;
$bank_balance += Snioney;
}
Else
{
Ssavings += 50;
$bank_balance -= 50;
}
?>
In this example, now that you’ve ascertained that you have $100 or more in the bank, the else statement is executed, by which you place some of this money into your savings account.
3. PHP if- else-if Statement
There are also times when you want a number of different possibilities to occur, based upon a sequence of conditions. You can achieve this using the if-else-if statement.
Syntax
If (condition) {
Code to be executed if this condition is true;
} elseif (condition) {
Code to be executed if this condition is true;
} else {
Code to be executed if all conditions are false;
}
Example : An if-else-if...else statement with curly braces
<7php
If ($bank_balance < 100)
{
Smoney= 1000;
$bank_balance += Snioney;
}
Elseif ($bank_balance > 200)
{
Ssavings += 100;
$bank_balance -= 100;
} else
{
Ssavings += 50;
$bank_balance -= 50;
}
?>
In the example, an else-if statement has been inserted between the if and else statements. It checks whether your bank balance exceeds $200 and, if so, decides that you can afford to save $100 of it this month.
4. PHP switch Statement
The switch statement is useful in cases in which one variable or the result of an expression can have multiple values, which should each trigger a different function.
For example, consider a PHP-driven menu system that passes a single string to the main menu code according to what the user requests. Let’s say the options are Home, About, News, Login, and Links, and we set the variable $page to one of these, according to the user’s input.
Syntax:
Switch (n) {
Case Iabell:
Code to be executed if n=labell;
Break;
Case label2:
Code to be executed if n=label2;
Break;
Case label3:
Code to be executed if n=label3;
Break;
Default:
Code to be executed if n is different from all labels;
}
This is how it works: First we have a single expression n (most often a variable), that is evaluated once. The value of the expression is then compared with the values for each case in the structure. If there is a match, the block of code associated with that case is executed. Use break to prevent the code from running into the next case automatically. The default statement is used if no match is found.
Example : A switch statement
<?php
Sfavplace = ’’Delhi”;
Switch (Sfavplace) {
Case ’’Delhi”:
Echo ’’Your favorite place is Delhi!”;
Break;
Case ”pune”:
Echo ’’Your favorite place is pune!”;
Break;
Case ’’Bombay”:
Echo ’’Your favorite place is Bombay!”;
Break;
Default:
Echo ’’Your favorite place is neither Delhi, pune, nor Bombay!”;
} ?>
Output:
Your favorite place is Delhi!
PHP Loop Statements
Often when you write code, you want the same block of code to run over and over again in a row. Instead of adding several almost equal code-lines in a script, we can use loops to perform a task like this.
In PHP, we have the following looping statements:
● while: loops through a block of code as long as the specified condition is true
● do...while: loops through a block of code once, and then repeats the loop as long as the specified condition is true
● for: loops through a block of code a specified number of times
● foreach: loops through a block of code for each element in an array
1. The PHP while Loop
The while loop executes a block of code as long as the specified condition is true.
Syntax
While (condition is true) {
Code to be executed;
}
The example below first sets a variable $a to 1 ($a =1). Then, the while loop will continue to run as long as $a is less than, or equal to 5 ($a <= 5). $x will increase by 1 each time the loop runs ($a++):
Example:
<!D0CTYPE html>
<html>
<body>
<?php $a- 1;
While($a <= 5) {
Echo “The number is: $a <br>”;
$a++;
} ?>
<∕body>
<∕html>
Output:
The number is: 1
The number is: 2
The number is: 3
The number is: 4
The number is: 5
2. The PHP do...while Loop
The do...while loop will always execute the block of code once, it will then check the condition, and repeat the loop while the specified condition is true.
Syntax do { code to be executed;
The example below first sets a variable $a to 1 ($a = 1). Then, the do while loop will write some output, and then increment the variable $a with 1. Then the condition is checked (is $a less than, or equal to 5?), and the loop will continue to run as long as $a is less than, or equal to 5:
Example :
<!DOCTYPE html>
<html>
<body>
<7php
$a- 1;
Do {
Echo ’’The number is: $a <br>”;
$a++;
} while ($a <= 5);
?>
<∕body>
<∕html>
Output:
The number is: 1
The number is: 2
The number is: 3
The number is: 4
The number is: 5
Notice that in a do while loop the condition is tested AFTER executing the statements within the loop. This means that the do while loop would execute its statements at least once, even if the condition is false the first time.
The example below sets the $a variable to 6, then it runs the loop, and then the condition is checked:
3. ThePHP for Loop
The for loop is used when you know in advance how many times the script should run.
Syntax :
For (init counter; test counter; increment counter) {
Code to be executed;
Parameters:
● Init Counter: Initialize the loop counter value
● Test Counter: Evaluated for each loop iteration. If it evaluates to TRUE, the loop continues. If it evaluates to FALSE, the loop ends.
● Increment Counter: Increases the loop counter value
The example below displays the numbers from O to 10:
Example :
<?php
For ($a = O; $a <= 10; $a++) {
Echo ’’The number is: $a <br>”;
}
?>
Output:
The number is: 0
The number is: 1
The number is: 2
The number is: 3
The number is: 4
The number is: 5
The number is: 6
The number is: 7
The number is: 8
The number is: 9
The number is: 10
4. The PHP foreach Loop
The foreach loop works only on arrays, and is used to loop through each key/value pair in an array.
Syntax
Foreach (Sarray as Svalue) {
Code to be executed;
}
For every loop iteration, the value of the current array element is assigned to Svalue and the array pointer is moved by one, until it reaches the last array element.
The following example demonstrates a loop that will output the values of the given array (Scolors):
Example:
<7php
Scolors = array(“red”, ’’green”, &”blue”, “yellow”);
Foreach (Scolors as Svalue) {
Echo “Svalue <br>”;
}
?>
Output:
Red
Green
Blue
Yellow
An array is a data structure that stores one or more similar type of values in a single value. For example if you want to store IOO numbers then instead of defining 100 variables its easy to define an array of 100 length.
Features of an Array
● An array declaration allocates sequential memory blocks.
● Arrays are static. This means that an array once initialized cannot be resized.
● Each memory block represents an array element.
● Array elements are identified by a unique integer called as the subscript ∕ index of the element.
● Like variables, arrays too, should be declared before they are used. Use the var keyword to declare an array.
● Array initialization refers to populating the array elements.
● Array element values can be updated or modified but cannot be deleted.
If you have a list of items (a list of car names, for example), storing the cars in single variables could look like this:
Scarsl = ’’Volvo”;
Scars2 = ’’BMW”;
Scars3 = ’’Toyota”;
However, what if you want to loop through the cars and find a specific one? And what if you had not 3 cars, but 300?
The solution is to create an array!
An array can hold many values under a single name, and you can access the values by referring to an index number.
1. One Dimensional Array:
For example, let’s say we want to store the player names for a five-person soccer team in an array called Steam. To do this, we could glue five matchboxes side by side and write down the names of all the players on separate pieces of paper, placing one in each matchbox.
Steam = array(Α , ‘B’, ‘C’, ‘D’, ‘E );
This syntax is more complicated than the ones Γve explained so far. The array building code consists of the following construct:
Array(); with five strings inside. Each string is enclosed in apostrophes. If we then wanted to know who player 4 is, we could use this command:
Echo Steam[3]; ∕∕ Displays the name D
2. Two-Dimensional Arrays:
● As an example of a two-dimensional array, let’s say we want to keep track of a game of tic- tac-toe, which requires a data structure of nine cells arranged in a 3×3 square.
● To represent this with matchboxes, imagine nine of them glued to each other in a matrix of three rows by three columns.
● You can now place a piece of paper with either an x or an o in the correct matchbox for each move played. To do this in PHP code, you have to set up an array containing three more arrays, as in example:
Example
<7 Php
$oxo = array(array( , x , , ’ ’, ’o’), array( , o , , ’o’, ’x’), array( , x , , ’o’, ’ ’));
?>
Once again, we have moved up a step in complexity, but it’s easy to understand if you grasp the basic array syntax. There are three arrayθ constructs nested inside the outer array() construct.
To then return the third element in the second row of this array, you would use the following PHP command, which will display an x:
Echo Soxo[l][2];
Key takeaway
An array is a data structure that stores one or more similar type of values in a single value. For example if you want to store IOO numbers then instead of defining 100 variables its easy to define an array of 100 length.
A function is a block of statements that can be used repeatedly in a program. A function will not execute immediately when a page loads. A function will be executed by a call to the function. PHP has hundreds of ready-made, built-in functions, making it a very rich language.
Defining a Function
The general syntax for a function is as follows:
Function function_name([parameter [,...]])
{
∕∕ Statements
}
The first line of the syntax indicates the following:
● A definition starts with the word function.
● A name follows, which must start with a letter or underscore, followed by any number of letters, numbers, or underscores.
● The parentheses are required.
● One or more parameters, separated by commas, are optional.
Function names are case-insensitive, so all of the following strings can refer to the print function:
PRINT, Print, and PrInT.
The opening curly brace starts the statements that will execute when you call the function; a matching curly brace must close it. These statements may include one or more return statements, which force the function to cease execution and return to the calling code. If a value is attached to the return statement, the calling code can retrieve it.
Example
In this example below, we create a function named ”writeMsg()”. The opening curly brace ( {) indicates the beginning of the function code and the closing curly brace ( } ) indicates the end of the function. The function outputs ’’Hello world!’’. To call the function, just write its name:
<!DOCTYPE html>
<html>
<body>
<?php
Function writeMsg() {
Echo ’’Hello world!”;
}
WriteMsg();
?>
<∕body>
<∕html>
Output:
Hello world!
PHP Function Arguments
Information can be passed to functions through arguments. An argument is just like a variable. Arguments are specified after the function name, inside the parentheses. You can add as many arguments as you want, just separate them with a comma.
The following example has a function with one argument (Sfname). When the familyName() function is called, we also pass along a name (e.g. Jani), and the name is used inside the function, which outputs several different first names, but an equal last name:
Example
<?php
Function familyName(Sfname) {
Echo n Sfname Refsnes.<br> n ;
}
FamilyName( ,, Jani n );
FamilyName(Ηege n );
FamilyName( n Stale n );
FamilyName( n Kai Jim”);
FamilyName(”Borge”);
?>
Output:
Jani Refsnes.
Hege Refsnes.
Stale Refsnes.
Kai Jim Refsnes.
Borge Refsnes.
PHP Default Argument Value
The following example shows how to use a default parameter. If we call the function setHeight() without arguments it takes the default value as argument:
Example
<!DOCTYPE html>
<html>
<body>
<7php
Function setHeight(Sminheight = 30) {
Echo ’’The height is : Sminheight <br>”;
}
SetHeight(IOO);
SetHeight();
SetHeight(90);
SetHeight(60);
?>
<∕body>
<∕html>
Output:
The height is : 100
The height is : 30
The height is : 90
The height is : 60
PHP Functions - Returning values
To let a function return a value, use the return statement:
Example
<?php
Function sum($x, $y) {
$z = $x + $y;
Return $z;
}
Echo ”5 + 10 = ”. Sum(5, 10). ”<br>”;
Echo ”7 + 13 = ” . Sum(7, 13). ”<br>”;
Echo ”2 + 4 = ”. Sum(2, 4);
?>
Output:
5 + 10= 15
7+13 = 20
2 + 4 = 6
Key takeaway
A function is a block of statements that can be used repeatedly in a program. A function will not execute immediately when a page loads. A function will be executed by a call to the function. PHP has hundreds of ready-made, built-in functions, making it a very rich language.
Regular expressions (regexes) are a series of characters that describe a specific search pattern in the form of a text string. They are primarily used in programming to match some vaguely defined patterns in order to complete some related activities. Regexes are sometimes thought of as a tiny computer language that uses a pattern notation to allow users to parse text strings. Because the exact sequence of characters is unknown in advance, the regex assists in retrieving the appropriate strings based on a pattern specification.
A Regular Expression is a short way to describe a string pattern that matches a specific quantity of text. Regular expression functions are a key feature in PHP, which is an open-source language often used for website development. Many other programming languages, like PHP, have their own regular expression implementation. This is also true of other apps, which have their own set of regexes with different syntaxes. Regexes are used on very big files and strings in many modern languages and technologies. Let's look at some of the benefits and applications of regular expressions in our apps.
Advantages and uses
Because most programming deals with data entries, developers often run into issues when data is collected in free text fields. In today's application programming, regular expressions are employed practically everywhere.
● Regular expressions aid in the validation of text strings of interest to programmers.
● It provides a sophisticated tool for evaluating text data, searching for patterns, and changing it.
● It aids in the flexible search for a specific string pattern and extraction of matching results.
● It aids in the parsing of text files in search of a specific sequence of characters that can be used for further analysis or data processing.
● Easy and straightforward options for identifying patterns are offered with the aid of in-built regexes routines.
● It effectively saves a significant amount of development time spent looking for a specific string pattern.
● It aids in the validation of critical user information such as email addresses, phone numbers, and IP addresses.
● It allows you to highlight specific keywords in a file depending on a search result or user input.
● It aids in the identification of specific template tags and the replacement of those values with actual data as required.
● Regexes come in handy for creating an HTML template system that recognises tags.
● Browser detection, spam filtering, password strength checks, and form validations are all common uses for regexes.
We won't be able to cover everything in this topic, but let's have a look at some of the most important regular expression topics. The table below illustrates some regular expressions and the string that corresponds to the regular expression pattern.
Expression | Matches |
[abc] | a, b, or c |
[a-z] | Any lowercase letter |
[^A-Z] | Any letter which is NOT a uppercase letter |
(gif|png) | Either “gif” or “png” |
[a-z]+ | One or more lowercase letters |
^[a-zA-Z0-9]{1, }$ | Any word with at least one number or one letter |
([ax])([by]) | Ab, ay, xb, xy |
[^A-Za-z0-9] | Any symbol other than a letter or other than number |
([A-Z]{3}|[0-9]{5}) | Matches three letters or five numbers |
Key takeaway
Regular expressions (regexes) are a series of characters that describe a specific search pattern in the form of a text string. They are primarily used in programming to match some vaguely defined patterns in order to complete some related activities. Regexes are sometimes thought of as a tiny computer language that uses a pattern notation to allow users to parse text strings.
The website users interact with PHP and MySQL is through the use of HTML forms. These were introduced very early on in the development of the World Wide Web in 1993, even before the advent of ecommerce and have remained a mainstay ever since, due to their simplicity and ease of use. Of course, enhancements have been made over the years to add extra functionality to HTML form handling.
Building Forms Handling forms is a multipart process. First a form is created, into which a user can enter the required details. This data is then sent to the web server, where it is interpreted, often with some error checking. If the PHP code identifies one or more fields that require reentering, the form may be redisplayed with an error message. When the code is satisfied with the accuracy of the input, it takes some action that usually involves the database, such as entering details about a purchase.
To build a form, you must have at least the following elements:
● An opening and closing tag
● A submission type specifying either a Get or Post method
● One or more input fields
● The destination URL to which the form data is to be submitted
Example
shows a very simple form created with PHP, which you should type in and save as
Formtest.php.
Formtest.php—a simple PHP form handler
<?php ∕∕ formtest.php
Echo <«_END
<html>
<head>
<title>Form Test<;∕title>
<∕head>
<body>
<form method-’post” action=”formtest.php”>
What is your name?
<input type=”text” name=”name”>
<input type=”submit”>
<∕form>
<∕body>
<∕html>
END;
?>
The only modifications are a couple of lines at the beginning that check the $_POST associative array for the submitted field name.
1. DefaultValues
● Sometimes it’s convenient to offer your site visitors a default value in a web form. For example, suppose you put up a loan repayment calculator widget on a real estate website. It could make sense to enter default values of, say, 25 years and 6 percent interest, so that the user can simply type either the principle sum to borrow or the amount that she can afford to pay each month.
Example: Setting default values
<form method-’post” action=”calc.php”><pre>
Loan Amount <input type=”text” name- , principle”>
Monthly Repayment <input type=”text” name- , monthly”>
Number of Years <input type=”text” name=”years”value=”25”>
Interest Rate <input type=”text” name=”rate” value=”6”>
<input type=”submit”>
<∕pre><∕form>
● If you wish to try this (and the other HTML code samples), type it and save it with an .html (or .htm) file extension, such as test.html (or test.htm), and then load that file into your browser.
● Take a look at the third and fourth inputs. By populating the value attribute, you display a default value in the field, which the users can then change if they wish.
● With sensible default values, you can often make your web forms more user-friendly by minimizing unnecessary typing.
● Default values are also used for hidden fields if you want to pass extra information from your web page to your program, in addition to what users enter.
2. Input Types
HTML forms are very versatile and allow you to submit a wide range of input types, from text boxes and text areas to checkboxes, radio buttons, and more.
● TextBoxes
The input type you will probably use most often is the text box. It accepts a wide range of alphanumeric text and other characters in a single-line box. The general format of a text box input is as follows:
<inputtype-’text” name-’name” size=”size” maxlength-’length” value=”value”>
We’ve already covered the name and value attributes, but two more are introduced here: size and maxlength. The size attribute specifies the width of the box (in characters of the current font) as it should appear on the screen, and maxlength specifies the maximum number of characters that a user is allowed to enter into the field.
The only required attributes are type, which tells the web browser what type of input to expect, and name, for giving the input a name that will be used to process the field upon receipt of the submitted form.
● TextAreas
When you need to accept input of more than a short line of text, use a text area. This is similar to a text box, but, because it allows multiple lines, it has some different attributes. Its general format looks like this:
<textareaname-’name” cols-’width” rows=”height” wrap=”type”><∕textarea>
The first thing to notice is that<textarea> has its own tag and is not a subtype of the <input> tag. It therefore requires a closing <∕textarea> to end input.
Instead of a default attribute, if you have default text to display, you must put it before the closing<∕textarea>, and it will then be displayed and be editable by the user:
<textarea name=”name” cols-’width” rows=”height” wrap=”ype”>
This is some default text.
<∕textarea>
To control the width and height, use the cols and rows attributes. Both use the character spacing of the current font to determine the size of the area. If you omit these values, a default input box will be created that will vary in dimensions depending on the browser used, so you should always define them to be certain about how your form will appear.
Last, you can control how the text entered into the box will wrap (and how any such wrapping will be sent to the server) using the wrap attribute. Table 1, shows the wrap types available. If you leave out the wrap attribute, soft wrapping is used.
● Checkboxes
When you want to offer a number of different options to a user, from which he can select one or more items, checkboxes are the way to go. Here is the format to use:
<inputtype-’checkbox” name=”name” value-’value” checked=”checked”>
If you include the checked attribute, the box is already checked when the browser is displayed. The string you assign to the attribute should be either a double quote or the value “checked”, or there should be no value assigned. If you don’t include the attribute, the box is shown unchecked. Here is an example of creating an unchecked box:
I Agree <input type-’checkbox” name=”agree”>
If the user doesn’t check the box, no value will be submitted. But if he does, a value of ”on” will be submitted for the field named agree. If you prefer to have your own value submitted instead of the word on (such as the number 1), you could use the following syntax:
I Agree <;input type-’checkbox” name=”agree” value=” 1”>
On the other hand, if you wish to offer a newsletter to your readers when submitting a form, you might want to have the checkbox already checked as the default value:
Subscribe? <input type-’checkbox” name=”news” checked=”checked”>
If you want to allow groups of items to be selected at one time, assign them all the same name.
● Radio Buttons
Radio buttons are named after the push-in preset buttons found on many older radios, where any previously depressed button pops back up when another is pressed. They are used when you want only a single value to be returned from a selection of two or more options. All the buttons in a group must use the same name and, because only a single value is returned, you do not have to pass an array.
For example, if your website offers a choice of delivery times for items purchased from your store, you might use HTML like that in Example
Example
Using radio buttons
8am-Noon<input type=”radio” name=”time” value=” 1”>
Noon-4pm<input type-’radio” name=”time” value- , 2” checked=”checked”> 4pm-8pm<input type-’radio” name=”time” value=”3”>
Here, the second option of Noon-4pm has been selected by default. This default choice ensures that at least one delivery time will be chosen by the user, which she can change to one of the other two options if she prefers. Had one of the items not been already checked, the user might forget to select an option, and no value would be submitted at all for the delivery time. By default, radio buttons are round.
● Hidden Fields
Sometimes it is convenient to have hidden form fields so that you can keep track of the state of form entry. For example, you might wish to know whether a form has already been submitted.
You can achieve this by adding some HTML in your PHP code, such as the following:
Echo ,<input type-’hidden” name=”submitted”value- , yes”>,
This is a simple PHP echo statement that adds an input field to the HTML form. Let’s assume the form was created outside the program and displayed to the user. The first time the PHP program receives the input, this line of code has not run, so there will be no field named submitted. The PHP program re-creates the form, adding the input field. So when the visitor resubmits the form, the PHP program receives it with the submitted field set to “yes”. The code can simply check whether the field is present:
If (isset($_POST[’submitted’]))
{...
Hidden fields can also be useful for storing other details, such as a session ID string that you might create to identify a user, and so on.
● <select>
The <select> tag lets you create a drop-down list of options, offering either single or multiple selections. It conforms to the following syntax:
<select name=”name” size=”size”; multiple- , multiple”>
The attribute size is the number of lines to display. Clicking on the display causes a list to drop down, showing all the options. If you use the multiple attribute, a user can select multiple options from the list by pressing the Ctrl key when clicking. So to ask a user for his favorite vegetable from a choice of five, you might use HTML as in Example.
Example
Using select
Vegetables
<select name=”veg” size=”l”>
<option value=”Peas”>Peas<∕option>
<option value=”Beans”>Beans<∕option>
<option vahιe=”Carrots”>Carrots<∕option>
<option value=”Cabbage”>Cabbage<∕option>
<option value=”Broccoli”>Broccoli<∕option>
<∕select>
This HTML offers five choices, with the first one, Peas, pre-selected (due to it being the first item). Fig. Shows the output where the list has been clicked to drop it down, and the option Carrots has been highlighted. If you want to have a different default option offered first (such as Beans), use the <selected>tag, like this:
<option selected=”selected”value=”Beans”>Beans<∕option>
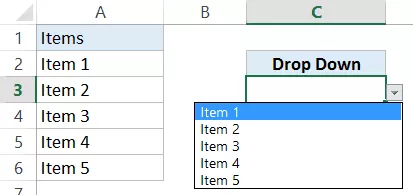
Fig 1: Creating a drop-down list
● Labels
You can provide an even better user experience by utilizing the tag. With it, you can surround a form element, making it selectable by clicking any visible part contained between the opening and closing tags.
For example, going back to the example of choosing a delivery time, you could allow the user to click the radio button itself and the associated text, like this:
<label>8am-Noon<input type= n radio π name= π time π value=”l”><∕label>
The text will not be underlined like a hyperlink when you do this, but as the mouse passes over, it will change to an arrow instead of a text cursor, indicating that the whole item is clickable.
● The submit button
To match the type of form being submitted, you can change the text of the submit button to anything you like by using the value attribute, like this:
<input type-’submit” value= ,, Search’ , >
You can also replace the standard text button with a graphic image of your choice, using HTML such as this:
<inputtype-’image” name-’submit” src-’image.gif’>
● Sanitizing Input
Now we return to PHP programming. It can never be emphasized enough that handling user data is a security minefield, and that it is essential to leam to treat all such data with utmost caution from the word go. It’s actually not that difficult to sanitize user input from potential hacking attempts, but it must be done.
The first thing to remember is that regardless of what constraints you have placed in an HTML form to limit the types and sizes of inputs, it is a trivial matter for a hacker to use her browser’s View Source feature to extract the form and modify it to provide malicious input to your website.
Therefore, you must never trust any variable that you fetch from either the $_GET or $_POST arrays until you have processed it. If you don’t, users may try to inject Java- Script into the data to interfere with your site’s operation, or even attempt to add MySQL commands to compromise your database.
Therefore, instead of just using code such as the following when reading in user input: Svariable = $_POST[’user input’];
You should also use one or more of the following lines of code. For example, to prevent escape characters from being injected into a string that will be presented to MySQL, use the following.
Remember that this function takes into account the current character set of a MySQL connection, so it must be used with a mysqli connection object (in this instance, Sconnection).
Svariable = $connection->real_escape_string($variable);
To get rid of unwanted slashes, use this:
Svariable = Stripslashes(Svariable);
And to remove any HTML from a string, use the following:
Svariable = htmlentities(Svariable);
For example, this would change a string of interpretable HTML code like <b>hi<∕b> into <b>hi</b>, which displays as text, and won’t be interpreted as HTML tags.
Finally, if you wish to strip HTML entirely from an input, use the following (but ensure you use it before calling htmlentities, which replaces any angle brackets used as part of HTML tags):
Svariable = StripJags(Svariable);
In fact, until you know exactly what sanitization you require for a program, Example shows a pair of functions that brings all these checks together to provide a very good level of security.
Example
The SanitizeString and SanitizeMySQL functions
<?php
Function SanitizeString(Svar)
{
Svar = Stripslashes(Svar);
Svar = StripJags(Svar);
Svar = htmlentities(Svar);
Return Svar;
Function sanitizeMySQL(Sconnection, Svar)
{
Svar = $connection->real_escape_string($var);
Svar = SanitizeString(Svar);
Return Svar;
}
?>
Add this code to the end of your PHP programs, and you can then call it for each user input to sanitize, like this:
Svar = sanitizeString(S JPOST[‘userJnpuf ]);
Or, when you have an open MySQL connection, and a nιysqli connection object (in this case, called Sconnection):
Svar = sanitizeMySQL(Sconnection, S POST[ , user input’]);
Example
So let’s look at how a real-life PHP program integrates with an HTML form by creating the program convert.php. A program to convert values between Fahrenheit and Celsius <7php ∕∕
Convert.php
Sf= Sc = ”;
If (isset($_POST[’f])) Sf= sanitizeString(SJ>OST[ , f]);
If (isset(SJPOST[‘c’])) Sc = sanitizeString(S J>OST[‘c’]);
If(Sf !=”)
{
Sc = intval((5 ∕ 9) * ($f - 32));
Sout = ”$f 0 f equals Sc °c”;
}
Elseif(Sc != ”)
J
Sf= intval((9 / 5)* Sc + 32);
$out = ”$c 0 c equals Sf °f”;
}
Else Sout =
Echo «<_END
<html>
<head>
<title>Temperature Converter<∕title>
<∕head>
<body>
<pre>
Enter either Fahrenheit or Celsius and click on Convert
<b>Sout<∕b>
<form method-’post” action-’convert.php”>
Fahrenheit <input type=”text”; name=”f’ size=”7”>
Celsius <input type=”text” name=”c” size=”7”>
<input type=”submit” value- , Convert”>
<∕form>
<∕pre>
<∕body>
<∕html>
END;
Function SanitizeString(Svar)
{
Svar = Stripslashes(Svar);
Svar = StripJags(Svar);
Svar = Irtmlentities(Svar);
Return Svar;
}
?>
Key takeaway
The website users interact with PHP and MySQL is through the use of HTML forms. These were introduced very early on in the development of the World Wide Web in 1993, even before the advent of ecommerce and have remained a mainstay ever since, due to their simplicity and ease of use.
The processing of files is a crucial part of the web application development process.
The following events are used to process files for various tasks:
● PHP Open a File,
● PHP Read a File,
● PHP Close a File,
● PHP Write a File,
● PHP Appending a File and
● PHP uploading a File.
PHP Open a File
In PHP, the function fopen() is a system function. This function aids in the opening of a file on a server. It has two parameters: one for the file and the other for the mode in which it should be opened (Read/Write).
Syntax:
$file_Object= fopen(“FileName”, “Read/WriteMode”) or die(“Error Message!”);
Example:
<?php
$myfile = fopen(“Student.txt”, “r”) or die(“Unable to open file!”);
?>
PHP Read a File:
The fread() method reads from a file that is currently open. The fopen function returns a file object.
Syntax:
Fread($file_Object,filesize(“FileName”));
Example:
<?php
Fread($myfile,filesize(“Student.txt”));
?>
PHP Close a File:
The fclose() method is used to close a file that has been opened. The fopen function returns a file object.
Syntax:
Fclose($file_Object);
Example:
<?php
$myfile = fopen(“student.txt”, “r”); // some code to be executed....
Fclose($myfile);
?>
PHP write a File:
To write to a file, use the fwrite() method.
Syntax:
Fwrite($myfile, $txt);
Key takeaway
Action of the Form Attribute Your data has been passed to a backend script, which is ready to process it.
This is the method that will be used to upload data. The GET and POST methods are the most commonly utilised.
Target Specify the window or frame in which the script's result will be presented. It accepts values such as _blank, _self, _parent, and so on.
The enctype attribute can be used to specify how the browser encodes data before sending it to the server.
● A cookie is an item of data that a web server saves to your computer’s hard disk via a web browser. It can contain almost any alphanumeric information (as long as it’s fewer than 4 KB) and can be retrieved from your computer and returned to the server.
● Common uses include session tracking, maintaining data across multiple visits, holding shopping cart contents, storing login details, and more.
● Because of their privacy implications, cookies can be read only from the issuing domain. In other words, if a cookie is issued by, for example, gmail.com, it can be retrieved only by a web server using that domain. This prevents other websites from gaining access to details for which they are not authorized.
● Because of the way the Internet works, multiple elements on a web page can be embedded from multiple domains, each of which can issue its own cookies.
When this happens, they are referred to as third-party cookies. Most commonly, these are created by advertising companies in order to track users across multiple websites. Cookies are exchanged during the transfer of headers, before the actual HTML of a web page is sent, and it is impossible to send a cookie once any HTML has been transferred. Therefore, careful planning of cookie usage is important. Fig. 4.9 illustrates a typical request and response dialog between a web browser and web server passing cookies.
This exchange shows a browser receiving two pages:
1. The browser issues a request to retrieve the main page, index.html, at the website http://www.webserver.com . The first header specifies the file, and the second header specifies the server.
2. When the web server at webserver.com receives this pair of headers, it returns some of its own. The second header defines the type of content to be sent (text/ html), and the third one sends a cookie of the name and with the value. Only then are the contents of the web page transferred.
3. Once the browser has received the cookie, it will then return it with every future request made to the issuing server until the cookie expires or is deleted. So, when the browser requests the new page /news.html, it also returns the cookie name with the value.
4. Because the cookie has already been set, when the server receives the request to send /news.html, it does not have to resend the cookie, but just returns the requested page.
Setting a Cookie in PHP
Setting a cookie in PHP is a simple. As long as no HTML has yet been transferred, you can call the setcookie function, which has the following syntax setcookie(name, value, expire, path, domain, secure, httponly);
Parameter | Description | Example |
Name | The name of the cookie. This is the name that your server will use to access the cookie on subsequent browser requests. | Username |
Value | The value of the cookie, or the cookie’s contents. This can contain up to 4 KB of alphanumeric text. | Mustary |
Expire | Unix timestamp of the expiration date. Generally, you will probably use time() plus a number of seconds. If not set, the cookie expires when the browser closes. | Time() + 600
|
Path | The path of the cookie on the server. If this is a ∕ (forward slash), the cookie is available over the entire domain, such as www.nirali.com . If it is a subdirectory, the cookie is available only within that subdirectory. The default is the current directory that the cookie is being set in, and this is the setting you will normally use. | / |
Domain | The Internet domain of the cookie. If this is .nirali.com, the cookie is available to all of nirali.com and its subdomains, such as Www.nirali.com and images.nirali.com. If it is images.nirali.com, the cookie is available only to images.nirali.com and its subdomains such as sub.images.nirali.com, but not, say, to Www.nirali.com | .nirali.com
|
Secure | Whether the cookie must use a secure connection (https://). If this value is TRUE, the cookie can be transferred only across a secure connection. The default is FALSE | FALSE |
Httponly | Whether the cookie must use the HTTP protocol. If this value is TRUE, scripting languages such as JavaScript cannot access the cookie. The default is FALSE. | FALSE |
Here’s an example that uses setcookie() function to create a cookie named username and assign the value Mustary to it. It also specify that the cookie will expire after 30 days (30 days * 24 hours * 60 min * 60 sec).
Example
<7php
∕∕ Setting a cookie
Setcookie( ,’username”, “Mustary”, time()+30*24*60*60);
?>
Accessing a Cookie
Reading the value of a cookie is as simple as accessing the $_COOKIE system array. For example, if you wish to see whether the current browser has the cookie called user name already stored and, if so, to read its value, use the following:
If (isset($COOKIE[’username’])) Susemame = $C00KIE[’username’];
The following example creates a cookie named "user” with the value n Mustary ”. The cookie will expire after 7 days (86400 * 7). The means that the cookie is available in entire website (otherwise, select the directory you prefer).
We then retrieve the value of the cookie "user” (using the global variable $_COOKIE). We also use the isset() function to find out if the cookie is set:
Example
<!DOCTYPE html>
<7php
Scookiejiame = ’’user”;
Scookiejvalue = ’’Mustary”;
Setcookie(Scookiejιame, $cookie_value, time() + (86400 * 7), ∕∕ 86400 = 1 day
?>
<html>
<body> <7php
If(!isset($_COOKIE[$cookie_name])) {
Echo ’’Cookie named ’”. Scookiejiame . ”’ is not set!”;
} else {
Echo ’’Cookie ’”. Scookiejiame . ’” is set!<br> π ;
Echo ’’Value is: ”. $_COOKIE[$cookie_name];
}
?>
<p><strong>Note:</strong>You might have to reload the page to see the value of the cookie <∕p>
<∕body>
<∕html>
Output:
Cookie named ’user’ is not set!
Note: You might have to reload the page to see the value of the cookie.
Destroying a Cookie
To delete a cookie, you must issue it again and set a date in the past. It is important for all parameters in your new setcookie call except the timestamp to be identical to the parameters when the cookie was first issued; otherwise, the deletion will fail. Therefore, to delete the cookie created earlier, you would use the following:
Setcookie(’username’, ‘Mustary’, time() - 2592000, 7’);
Example:
<!DoCTYPE html>
<?php
∕∕ set the expiration date to one hour ago setcookie(“user”, ””, time() - 3600);
?>
<html>
<body>
<7php
Echo “Cookie ’user’ is deleted.’’;
?>
<body>
<∕html>
Output: Cookie ’user’ is deleted.
Key takeaway
A cookie is an item of data that a web server saves to your computer’s hard disk via a web browser. It can contain almost any alphanumeric information (as long as it’s fewer than 4 KB) and can be retrieved from your computer and returned to the server.
Although you can store data using cookies but it has some security issues. Since cookies are stored on user’s computer it is possible for an attacker to easily modify a cookie content to insert potentially harmful data in your application that might break your application.
Also every time the browser requests a URL to the server, all the cookie data for a website is automatically sent to the server within the request. It means if you have stored 5 cookies on user’s system, each having 4KB in size, the browser needs to upload 20KB of data each time the user views a page, which can affect your site’s performance. You can solve both of these issues by using the PHP session.
1. What is a Session?
A PHP session stores data on the server rather than user’s computer. In a session based environment, every user is identified through a unique number called session identifier or SID. This unique session ID is used to link each user with their own information on the server like emails, posts, etc.
2. Starting a Session
Starting a session requires calling the PHP function session_start before any HTML has been output, similarly to how cookies are sent during header exchanges. Then, to begin saving session variables, you just assign them as part of the $_SESSION array, like this: $_SESSION[’variable’]
= Svalue;
They can then be read back just as easily in later program runs, like this:
Svariable = $ SESSION[‘variable’];
Example
Let’s create a new page called ”First_sessionl.php”. In this page, we start a new PHP session and set some session variables:
<7php
∕∕ Start the session
Session_start();
?>
<!DOCTYPE html>
<html>
<body>
<7php
∕∕ Set session variables
$_SESSION[”favcolor”] = ’’green”;
$_SESSION[”favanimal”] = ’’cat”;
Echo ’’Session variables are set.”;
?>
<∕body>
<∕html>
Output: Session variables are set.
3. Get PHP Session Variable Values
Next, we create another page called ”Second_session2.php”. From this page, we will access the session information we set on the first page (”First_sessionl.php”).
Notice that session variables are not passed individually to each new page, instead they are retrieved from the session we open at the beginning of each page (session - start()).
Also notice that all session variable values are stored in the global $_SESSION variable:
Example
<?php
Session_start();
?>
<!DOCTYPE html>
<html>
<body>
<?php
∕∕ Echo session variables that were set on previous page
Echo ’’Favorite color is ”. $_SESSION[”favcolor”] . ” <br>”;
Echo ’’Favorite animal is ”. $_SESSION[’’favanimal”] . ?>
<∕body>
<∕html>
Output: Favorite color is green.
Favorite animal is cat.
4. Destroying a Session
If you want to remove certain session data, simply unset the corresponding key of the $_SESSION associative array. However, to destroy a session completely, simply call the session_destroy() function. This function does not need any argument and a single call destroys all the session data.
Example
<7php
Session_start();
?>
<!DOCTYPE html>
<html>
<body>
<7php
∕∕ remove all session variables
Session_unset();
∕∕ destroy the session session_destroy();
Echo "All session variables are now removed, and the session is destroyed.”
?>
<∕body>
<∕html>
Output: All session variables are now removed, and the session is destroyed.
5. Setting a Time-Out
There are other times when you might wish to close a user’s session yourself, such as when the user has forgotten or neglected to log out, and you want the program to do so for her for her own security. You do this by setting the time-out after which a log- out will automatically occur if there has been no activity.
To do this, use the ini_set function as follows. This example sets the time-out to exactly one day:
Ini_set(’session.gc_maxlifetime’, 60 * 60*24);
If you wish to know what the current time-out period is, you can display it using the following:
Echo ini_get(’session.gc_maxlifetime’);
Key takeaway
A PHP session stores data on the server rather than user’s computer. In a session based environment, every user is identified through a unique number called session identifier or SID. This unique session ID is used to link each user with their own information on the server like emails, posts, etc.
● Instead of using MySQL’s command line to enter instructions and view output, you will create query strings that are passed to MySQL.
● When MySQL returns its response, it will come as a data structure that PHP can recognize instead of the formatted output you see when you work on the command line. Further PHP commands can retrieve the data and format it for the web page.
● With PHP, we can connect to and manipulate databases. MySQL is the most popular database system used with PHP.
What is MySQL?
● It is a database system used on the web and runs on a server
● MySQL is an ideal for both small and large applications
● It is very fast, reliable, and easy to use. It uses standard SQL
● MySQL compiles on a number of platforms
● MySQL is free to download and use
● It is developed, distributed, and supported by Oracle Corporation
Download MySQL Database
● If you don’t have a PHP server with a MySQL Database, you can download it from: http://www.mysql.com
● PHP 5 and later can work with a MySQL database using:
○ MySQLi extension (the “i”; stands for improved)
○ PDO (PHP Data Objects)
● Earlier versions of PHP used the MySQL extension. However, this extension was deprecated in 2012.
MySQLi Installation
For Linux and Windows: The MySQLi extension is automatically installed in most cases, when php5 mysql package is installed.
For installation details, go to: http://php.net/manual/en/mysqli.installation.php
PDO Installation
For installation details, go to: http://php.net/manual/en/pdo.installation.php
The Process
The process of using MySQL with PHP is as follows:
1. Connect to MySQL and select the database to use.
2. Build a query string.
3. Perform the query.
4. Retrieve the results and output them to a web page.
5. Repeat steps 2 to 4 until all desired data has been retrieved.
6. Disconnect from MySQL.
Ways of Connecting to MySQL through PHP
● In order to store or access the data inside a MySQL database, you first need to connect to the MySQL database server. PHP offers two different ways to connect to MySQL server: MySQLi(Improved MySQL) and PDO (PHP Data Objects) extensions.
● While the PDO extension is more portable and supports more than twelve different databases, MySQLi extension as the name suggests supports MySQL database only. MySQLi extension however provides an easier way to connect to, and execute queries on, a MySQL database server.
● Both PDO and MySQLi offer an object-oriented API, but MySQLi also offers a procedural API which is relatively easy for beginners to understand.
Creating a Login File
Most websites developed with PHP contain multiple program files that will require access to MySQL and will thus need the login and password details. Therefore, it’s sensible to create a single file to store these and then include that file wherever it’s needed.
Example : The login.php file
<7php ∕∕ login.php
$hn = l Iocalhosf;
$db = ’publications’;
$un = ‘username’;
$pw = ‘password’;
?>
● Type the example, replacing username and password with the values you use for your MySQL database, and save it to the document root directory.
● The hostname localhost should work as long as you’re using a MySQL database on your local system, and the database is publications.
● The enclosing tags are especially important for the login.php file in Example, because they mean that the lines between can be interpreted only as PHP code.
● The $hn variable will tell PHP which computer to use when connecting to a database. This is required, because you can access MySQL databases on any computer connected to your PHP installation, and that potentially includes any host anywhere on the Web. However, the examples in this chapter will be working on the local server. So, in place of specifying a domain such as mysql.myserver.com, you can just use the word localhost (or the IP address 127.0.0.1). The database we’ll be using, $db, is the one called publications.
Connecting to a MySQL Database
● Now that you have the login.php file saved, you can include it in any PHP files that will need to access the database by using the require_once statement. This is preferable to an include statement, as it will generate a fatal error if the file is not found. And believe me, not finding the file containing the login details to your database is a fatal error.
● Also, using require_once instead of require means that the file will be read in only when it has not previously been included, which prevents wasteful duplicate disk accesses. Below example shows the code to use.
Example : Connecting to a MySQL server with mysqli
<7php
Require_once ’login.php’;
Sservemame = ’’localhost”;
Susername = ’’username”;
Spassword = "password”;
∕∕ Create connection
Sconn = new mysqli(Sservername, Susemame, Spassword);
∕∕ Check connection
If ($conn->connect_error) {
Die( π Connection failed: ”. $conn->connect_error);
}
Echo ’’Connected successfully”;
?>
Example: creates a new object called Sconn by calling a new instance of the mysqli method, passing all the values retrieved from the login.php file. Error checking is achieved by referencing the $conn->connect_error property.
● The -> operator indicates that the item on the right is a property or method of the object on the left. In this case, if connect_error has a value, then there was an error, so we call the die function and display that property, which details the connection error. Closing the MySQL Database Server Connection
● The connection to the MySQL database server will be closed automatically as soon as the execution of the script ends. However, if you want to close it earlier you can do this by simply calling the PHP mysqli_close() function.
Sconn->close();
Example : Closing to a MySQL server with mysqli
<7php
Require_once ’login.php’;
Sservemame = ’’localhost”;
Susername = ’’username”;
Spassword = "password”;
∕∕ Create connection
Sconn = new mysqli(Sservername, Susemame, Spassword);
∕∕ Check connection
If ($conn->connect_error) {
Die( π Connection failed: ”. $conn->connect_error);
}
Echo ’’Connected successfully”;
Inysqli-Close(Sconn);
?>
Creating MySQL Database Using MySQLi and PDO
● Before saving or accessing the data, we need to create a database first. The CREATE DATABASE statement is used to create a new database in MySQL.
● Let’s make a SQL query using the CREATE DATABASE statement, after that we will execute this SQL query through passing it to the PHP query() function to finally create our database.
The following example creates a database named ‘, myDB”:
Example : (MySQLi Object-oriented)
<7php
Sservemame = ’’localhost”;
Susername = ’’username”;
Spassword = “password”;
∕∕ Create connection
Sconn = new mysqli(Sservername, Susemame, Spassword);
∕∕ Check connection
If ($conn->connect_error) {
Die( π Connection failed: ”. Sconn->connect error);
}
∕∕ Create database
Ssql = ’’CREATE DATABASE myDB”;
If (Sconn->query(Ssql) === TRUE) {
Echo ’’Database created successfully”;
} else {
Echo ’’Error creating database: ”. Sconn->error;
}
Sconn->close();
?>
PHP Create MySQL Tables
Create a MySQL Table Using MySQLi and PDO
● The SQL CREATE TABLE statement is used to create a table in database. Let’s make a SQL query using the CREATE TABLE statement, after that we will execute this SQL query through passing it to the PHP query() function to finally create our table.
● We will create a table named ’’MyGuests”, with five columns: ”id”, ’’firstname”, ’’lastname”, ’’email” and ”reg_date”:
CREATE TABLE MyGuests (
Id INT(6) UNSIGNED AUTOJNCREMENT PRIMARY KEY,
Firstname VARCHAR(30) NOT NULL,
Lastname VARCHAR(30) NOT NULL,
Email VARCHAR(50),
Reg_date TIMESTAMP
)
After the data type, you can specify other optional attributes for each column:
● NOT NULL : Each row must contain a value for that column, null values are not allowed
● DEFAULT value : Set a default value that is added when no other value is passed
● UNSIGNED : Used for number types, limits the stored data to positive numbers and zero
● AUTO INCREMENT: MySQL automatically increases the value of the field by 1 each time a new record is added
● PRIMARY KEY: Used to uniquely identify the rows in a table. The column with PRIMARY KEY setting is often an ID number, and is often used with AUTOINCREMENT
Each table should have a primary key column (in this case: the ”id” column). Its value must be unique for each record in the table.
The following examples shows how to create the table in PHP:
Example : (MySQLi Object-oriented):
<?php
Sservemame = ’’localhost”;
Susername = ’’username”;
Spassword = “password”;
Sdbname = ”myDB”;
∕∕ Create connection
Sconn = new mysqli(Sservername, Susemame, Spassword, Sdbname); ∕∕ Check connection
If ($conn->connect_error) {
Die( π Connection failed: ”. $conn->connect_error);
}
∕∕ sql to create table
Ssql = ’’CREATE TABLE MyGuests (
Id INT(6) UNSIGNED AUTOJNiCREMENT PRIMARY KEY,
fιrstname VARCHAR(30) NOT NULL,
Lastname VARCHAR(30) NOT NULL,
Email VARCHAR(50), reg_date TIMESTAMP )”;
If (Sconn->query(Ssql) === TRUE) {
Echo ’’Table MyGuests created successfully”;
} else {
Echo ’’Error creating table: ”. Sconn->error;
}
Sconn->close();
?>
PHP Insert Data Into MySQL
Insert Data Into MySQL Using MySQLi and PDO
After a database and a table have been created, we can start adding data in them. Here are some syntax rules to follow:
● The SQL query must be quoted in PHP
● String values inside the SQL query must be quoted
● Numeric values must not be quoted
● The word NULL must not be quoted
The INSERT INTO statement is used to add new records to a MySQL table:
INSERT INTO table_name (column I, column2, column3,...)
VALUES (valuel, value2, value3,...)
The following examples add a new record to the "MyGuests” table:
Example: (MySQLi Object-oriented)
<7php
Sservemame = ’’localhost”;
Susername = ’’username”;
Spassword = “password”;
Sdbname = ”myDB”;
// Create connection
Sconn = new mysqli(Sservername, Susemame, Spassword, Sdbname);
∕∕ Check connection
If ($conn->connect_error) { die( π Connection failed: ”. $conn->connect_error);
}
Ssql = ’’INSERT INTO MyGuests (firstname, lastname, email) VALUES (’John’, ’Doe’,
’john@example.com’)”;
If (Sconn->query(Ssql) === TRUE) {
Echo ’’New record created successfully”;
} else {
Echo ’’Error: ”. Ssql. “<br>”. Sconn->error;
}
Sconn->close();
?>
PHP Insert Multiple Records into MySQL
Insert Multiple Records Into MySQL Using MySQLi and PDO
Multiple SQL statements must be executed with the mysqli_multi_query() function. The following examples add three new records to the n MyGuests” table:
Example : (MySQLi Object-oriented)
<?php
Sservemame = ’’localhost”;
Susername = ’’username”;
Spassword = “password”;
Sdbname = ”myDB”;
∕∕ Create connection
Sconn = new mysqli(Sservername, Susemame, Spassword, Sdbname);
∕∕ Check connection
If ($conn->connect_error) {
Die( π Connection failed: ”. $conn->connect_error);
}
Ssql = ’’INSERT INTO MyGuests (firstname, lastname, email)
VALUES (’John’, ’Doe’, ’john@example.com’);”;
Ssql .= ’’INSERT INTO MyGuests (firstname, lastname, email)
VALUES (’Mary’, ’Moe’, ’mary@example.com’);”;
Ssql .= ’’INSERT INTO MyGuests (firstname, lastname, email)
VALUES (’Julie’, ’Dooley’, ’julie@example.com’)”;
If ($conn->multi_query($sql) === TRUE) {
Echo ’’New records created successfully”;
} else {
Echo ’’Error: ”. Ssql. “<br>”. Sconn->error;
}
Sconn->close();
?>
WAP is an international standard establishing how mobile devices can access information on the Internet. The 1997 WAP Forum specification is unique in that it is truly global and spans the numerous airlink standards. WAP specifies guidelines for the implementation of microbrowsers and the network-resident servers that connect portable wireless devices to the network infrastructure and the Web.
What is WAP?
● Wireless Application Protocol (WAP) is a set of standards designed to extend Internet services to mobile phones, pagers, and Personal Digital Assistants (PDAs).
● The development of WAP is coordinated by an industry-wide group of companies under the banner of the WAP Forum. The WAP Forum was created to apply the best principles of Internet application development to the wireless environment.
● WAP has become the de facto worldwide standard for the presentation and delivery of wireless information and telephony services on mobile phones and other wireless devices.
● It is an open protocol that provides the same development standards to all vendors irrespective of the underlying network system.
● It is designed to work under the low bandwidth constraints of wireless networks. These constraints are currently around IOKbps compared with the standard 56Kbps on home computers using domestic telephone lines with standard dialup modems.
● As most wireless computing devices have limited processing power and memory, and are designed with screen displays and small multifunction keypads, WAP was developed with these limitations in mind.
● WAP was created to address three main issues related to data communications across wireless networks: low bandwidth, high latency and connection availability.
● WAP uses a client/server architecture that employs an unsophisticated wireless based micro browser and requires only limited resources and a WAP gateway to deliver content from the server where it is stored.
● It is a standard independent of the air interface, the user interface, and the underlying data bearer.
Therefore, it is entirely interoperable, because WAP is based on existing Internet technologies, it leverages the massive investment in similar conventional Web tools, applications, servers, and their developers while considering the restricted bandwidth, processing power, and memory currently available on wireless portable devices.
Web content is available over existing wireless communication networks through a WAP gateway. Fig. Illustrates how an established WWW infrastructure, based on the Hypertext Transfer Protocol (HTTP), uses a WAP gateway to interface with the wireless network by translating HTTP requests into wireless device requests.
Fig 2: WAP
What is WML?
● Wireless Markup Language (WML) is to WAP and its handheld devices what Hypertext Markup Language (HTML) is to the Web and browsers such as Netscape and Internet Explorer.
It describes how content is presented to the wireless device, allowing you to display information, present input options, and tell user agents how to respond once an option has been selected using the keypad.
● WMLis a subset or an application of the extensible Markup Language (XML), and because WAP uses a similar model as the Internet, it allows content developers to quickly become proficient with this relatively simple tag-based language while allowing a clear development path.
● WML’s user interface is a WAP microbrowser optimized to map onto mobile wireless devices.
A WML document is called a deck, which is comparable to an HTML page.
● WAP gateways provide the interface between the network and Internet or intranet services. From this gateway, WML content is accessed over the Internet using the standard HTTP mechanism.
● WAP developers and content providers can get up to speed quickly with WML, as it follows the same programming model as the Web development model.
● It is a tag-based language specified as an XML document type, so all existing XML tools and some HTML development environments can be used to develop WAP applications.
● As standard HTTP is used for communication between gateway and servers, developers can use off-the-shelf Web servers to deploy their applications.
● Standard tools such as ColdFusion and CGI scripting languages such as Perl, PHP, and ASP generate content for dynamic WML applications.
● The WAP gateway translates wireless device requests into HTTP requests and then redirects the Web server’s HTTP responses to the device. WML files being sent to WAP-enabled handheld devices are compressed into a binary format by the WAP gateway.
● A WAP emulator is a program that implements a WAP microbrowser, but is designed to run on a non-WAP device, such as a Windows PC. Emulators are often used by developers to speed up the development process, as well as to reduce the costs of using WAP during testing each time a change is made. They are also useful to see how a real WAP device will look, because many of these emulators mimic the look and feel of real WAP devices. When a WAP emulator is used, a WAP gateway is not required because WML files are downloaded from a Web server or local file, and the emulator renders it in the Emulator window. Figure shows this process.
Fig 3: Process of WAP and WML using Gateway and Emulator
What is WMLscript?
● In addition to WML, the WAP Forum provides a scripting language called WMLScript. WMLScript is used alongside WML (or independently of it) to provide intelligence in the form of procedural logic to client services. WMLScript is to WMLwhat JavaScript is to HTML.
● WMLScript enhances the capabilities of WML in a number of ways.
● With it, you can access user agent facilities, check user input, generate local messages and dialogs, and execute user agent software.
● WMLScript defines functions containing flow control logic constructs such as while, if, and for, which can be called from the main body of the WML program.
● WMLScript is compiled by a WAP gateway into binary form to reduce the code’s size and therefore minimize transfer time.
● It defines a byte-code representation and a byte-code interpreter for optimal utilization of current low bandwidth channels and wireless device memory restrictions.
WMLScript uses the following syntax rules:
● The smallest unit of execution in WMLScript is a statement, and each statement must end with a semicolon (;).
● WMLScript is case sensitive.
● Comments can either be single-line (beginning with //) or multi-line (brack-eted by ∕* and */).
This syntax is identical to that of both C++ and Java.
● A Literal character string is defined as any sequence of zero or more charac-ters enclosed within double (“”) or single ( i ) quotes.
● Boolean literal values correspond to true and false.
● New variables are declared using the var keyword (i.e., var x;).
● WMLScript has no type checking done at compile-time or runtime, and no variable types are explicitly declared. Internally, the following data types are supported:
○ Boolean
○ Integer
○ Floating Point
○ String
○ Invalid
● You do not need to specify the type of any variable because WMLScript automatically attempts to convert between the different types as required. It is also worth noting that WMLScript is not object-oriented, so it is not possible to create your own user-defined data types programmatically.
The following are some example WAP applications:
● 123 Jump ( http://www.123jump.com ) A selection of stock data and news, all via WAP.
● 1477.com ( http://1477.com ) WAP/Web development services.
● 2PL World-Wide Hotel Guide ( http://wap.2pl.com ) A worldwide hotel guide accessible in multiple languages via a WAP-enabled device.
● AEGEE-Eindhoven ( http://wappy.to/aegee/ ) A Europe-wide students association, whose goal is to allow all students to integrate and learn about each others cultures.
● Ajaxo ( http://www.ajaxo.com ) A WAP service for Wireless Stock Trading from any WAP- enabled device.
● Aktiesidan ( http://mmm.aktiesidan.com/servlets/aktiesidan/ ) A Swedish stock-market monitoring service, all WAP-enabled.
● Amazon.com Bookshop ( http://www.amazon.com/phone/)Amazon.com has launched this WAP portal (HTML-based) for browsing books.
● Traffic Maps ( http://www.webraska.com/ ) A French service that monitors and shows the latest in traffic news via maps.
Key takeaway
WAP is an international standard establishing how mobile devices can access information on the Internet. The 1997 WAP Forum specification is unique in that it is truly global and spans the numerous airlink standards. WAP specifies guidelines for the implementation of microbrowsers and the network-resident servers that connect portable wireless devices to the network infrastructure and the Web.
The.NET Framework is a framework for creating and executing Windows applications and web services. The.NET Framework was created to achieve the following goals:
● Whether object code is stored and executed locally, locally but web-distributed, or remotely, provide a consistent object-oriented programming environment.
● Provide an environment for code execution that:
○ Conflicts in software deployment and versioning are minimised.
○ Encourages the safe execution of code, even if it was written by an unknown or semi-trusted third party.
○ Removes the performance issues associated with scripted or interpreted settings.
● Make the developer experience similar across a wide range of app kinds, including Windows and Web apps.
● To ensure that programming built on the.NET Framework works with other code, base all communication on industry standards.
The common language runtime (CLR) and the.NET Framework class library make up the.NET Framework. The.NET Framework is built on top of the common language runtime. Consider the runtime to be an agent that controls code at runtime, providing essential services like memory management, thread management, and remoting, as well as enforcing rigorous type safety and other sorts of code accuracy that improve security and resilience. The concept of code management is, in fact, a basic runtime principle. Managed code is code that targets the runtime, whereas unmanaged code is code that does not target the runtime. The class library is an object-oriented collection of reusable types that you may use to create apps that range from traditional command-line or graphical user interface (GUI) apps to apps that employ ASP.NET's latest developments, such as Web Forms and XML web services.
Unmanaged components can host the.NET Framework by loading the common language runtime into their processes and initiating the execution of managed code, resulting in a software environment that takes advantage of both managed and unmanaged features. The.NET Framework not only comes with a number of runtime hosts, but it also encourages the creation of third-party runtime hosts.
For example, ASP.NET hosts the runtime to offer managed programmes with a scalable, server-side environment. To allow ASP.NET apps and XML web services, ASP.NET works directly with the runtime.
Microsoft's.NET Framework is a software framework that was designed and developed by the company. The initial version of the.Net framework, 1.0, was released in 2002. In simple terms, it's a virtual machine for compiling and running applications written in various languages such as C#, VB.Net, and others.
Form-based apps, Web-based applications, and Web services are all built with it. The.Net platform supports a number of programming languages, the most popular of which being VB.Net and C#. It's used to create apps for Windows, phones, the web, and other platforms. It has a lot of features and also adheres to industry standards.
More than 60 programming languages are supported by the.NET Framework, with Microsoft designing and developing 11 of them. The.NET Framework supports the remaining Non-Microsoft Languages, however they were not planned or developed by Microsoft.
The.NET Framework Stack, which depicts the Framework's modules and components, is shown below.
The.NET Framework is made up of four major parts:
● Common Language Runtime (CLR)
● Framework Class Library (FCL),
● Core Languages (WinForms, ASP.NET, and ADO.NET), and
● Other Modules (WCF, WPF, WF, Card Space, LINQ, Entity Framework, Parallel LINQ, Task Parallel Library, etc.)
CLR (Common Language Runtime)
It's a programme execution engine that loads and runs the application. The software is converted to native code. It serves as a connection point between the framework and the operating system. It handles exceptions, manages memory, and collects garbage. It also includes features such as security, type safety, interoperability, and portability.
The following is a list of CLR components:
Fig 4: CLR components
FCL (Framework Class Library)
It's a standard library made up of thousands of classes that can be utilised to create an application. The FCL's core is the BCL (Base Class Library), which offers fundamental functionality.
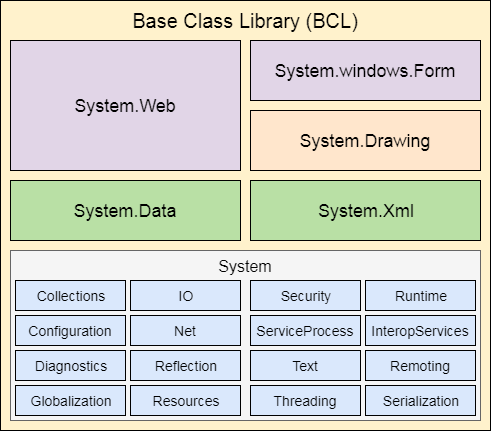
Fig 5: FCL
WinForms
WinForms is a smart client technology for the.NET Framework, consisting of a set of managed libraries that make typical application activities like reading and writing to the file system easier.
ASP.NET
Microsoft created and developed the ASP.NET web framework. Websites, web apps, and online services are all built with it. It has a wonderful HTML, CSS, and JavaScript integration. It was released for the first time in January 2002.
ADO.NET
ADO.NET is a.Net Framework module that establishes a connection between an application and its data sources. SQL Server and XML are examples of data sources. ADO.NET is a set of classes for connecting to, retrieving, inserting, and deleting data.
Key takeaway
The.NET Framework is a framework for creating and executing Windows applications and web services.
"C-Sharp" is how C# is pronounced. It is a Microsoft-provided object-oriented programming language that runs on. Framework for the Internet.
C# is a Microsoft-developed, general-purpose object-oriented programming language that has been accepted by the European Computer Manufacturers Association (ECMA) and the International Standards Organization (ISO) (ISO).
During the development of the.Net Framework, Anders Hejlsberg and his colleagues created C#.
C# is intended for the Common Language Infrastructure (CLI), which consists of executable code and a runtime environment that enables the use of a variety of high-level languages on a variety of computer platforms and architectures.
C# is a frequently used professional language for the following reasons:
● It's a versatile, modern programming language.
● It is structured in an object-oriented manner.
● It's a component-based system.
● It is simple to grasp.
● It is a grammatically correct language.
● It generates effective programmes.
● It can be built on a number of different computer platforms.
● It is a component of.
● Framework for the Internet.
We can create a variety of secure and strong applications using the C# programming language:
● Window applications
● Web applications
● Distributed applications
● Web service applications
● Database applications etc.
ECMA and ISO have approved C# as a standard. C# was created with the CLI in mind (Common Language Infrastructure). CLI is a specification for describing executable code and the environment in which it runs.
C# is influenced by C++, Java, Eiffel, Modula-3, Pascal, and other programming languages.
Features
C# is object oriented programming language. It provides a lot of features that are given below.
● Simple
● Modern programming language
● Object oriented
● Type safe
● Interoperability
● Scalable and Updateable
● Component oriented
● Structured programming language
● Rich Library
● Fast speed
Fig 6: Features of c#
Key takeaway
"C-Sharp" is how C# is pronounced. It is a Microsoft-provided object-oriented programming language that runs on. Framework for the Internet.
C# is a Microsoft-developed, general-purpose object-oriented programming language that has been accepted by the European Computer Manufacturers Association (ECMA) and the International Standards Organization (ISO) (ISO).
ASP.NET is a web development platform that includes a programming paradigm, a comprehensive software infrastructure, and a number of services for developing sophisticated web applications for both PCs and mobile devices.
ASP.NET is based on the CLR (Common Language Runtime), which allows programmers to use any.NET language (C#, VB, etc.) to execute its code. Because it provides an excellent integration of HTML, CSS, and JavaScript, it is specifically built to operate with HTTP and enables web developers to construct dynamic web pages, web applications, web sites, and online services.
The.NET Framework is used to develop a wide range of applications and services, including Console, Web, and Windows, among others. ASP.NET, on the other hand, is solely used to build web applications and web services. As a result, we call ASP.NET a subset of the.NET Framework.
ASP.NET is built on top of the HTTP protocol, and it makes use of HTTP commands and policies to establish bidirectional communication and cooperation between the browser and the server.
The Microsoft.Net platform includes ASP.NET. ASP.NET applications are compiled code built with the.Net framework's extensible and reusable components and classes. These programmes can access the entire.Net framework class hierarchy.
Any of the following languages can be used to write ASP.NET application code:
● C#
● Visual Basic.Net
● Jscript
● J#
Over the internet, ASP.NET is used to create interactive, data-driven web applications. It has a lot of controls including text boxes, buttons, and labels for putting together, setting, and modifying code to make HTML pages.
Below table illustrates the ASP.NET Versions History:
Year | Version |
2002 | 1.0 |
2003 | 1.1 |
2005 | 2.0 |
2006 | 3.0 |
2007 | 3.5 |
2008 | 3.5 SP 1 |
2010 | 4.0 |
2012 | 4.5 |
2013 | 4.5.1 |
2014 | 4.5.2 |
2015 | 4.6 |
2015 | 4.6.1 |
2016 | 4.6.2 |
2017 | 4.7 |
2017 | 4.7.1 |
Key takeaway
ASP.NET is a web development platform that includes a programming paradigm, a comprehensive software infrastructure, and a number of services for developing sophisticated web applications for both PCs and mobile devices.
There are three sorts of controls available in ASP.NET.
● HTML Controls
● HTML Server Controls
● Web Server Controls
HTML Controls
HTML controls are browser-parsed client-side controls. Because these controls are run on the client, the web page's performance is improved. HTML controls are not exposed to the web server in ASP.NET. In classic ASP, HTML controls are primarily used. Developers in traditional ASP must code everything (presentation and business logic) in a single page. These controls don't allow you to manage your state. In ASP.NET, HTML controls cannot be accessible from code behind files.
Classic ASP Web Page
<html>
<head><title>Employee Page</title></head>
<body>
<form name="EmployeeForm" method="post" action="Empupdate.asp"
Id="EmployeeForm" >
<input type="text" name="EmpName" id="EmpName" >
<input type="submit" name="SubmitButton" value="Submit" id="SubmitButton" >
</form>
</body>
</html>
HTML Server Controls
HTML server controls are mostly used to convert traditional ASP pages to ASP.NET pages. In ASP.NET, there are no specific HTML server controls, but the attribute runat="server" converts regular HTML controls to HTML server controls.
Converted ASP.NET code
<html>
<head><title>Employee Page</title></head>
<body>
<form name="EmployeeForm" method="post" id="EmployeeForm"
Runat="server">
<input type="text" name="EmpName" id="EmpName" runat="server">
<input type="submit" name="SubmitButton" value="Submit"
Id="SubmitButton" runat="server">
</form>
</body>
</html>
Look at the code above; the runat="server" property is only added to the controls and form tags. The "form" tag's action attribute has been removed. To work effectively, all HTML server controls should be placed inside a form tag with the runat="server" property.
Web Server Controls
The web server controls provided by ASP.NET are extensive. In comparison to HTML server controls, they offer more capability.
Property
● This programme runs on the web server.
● By default, all ASP.NET server controls contain the runat="server" attribute.
● State management is provided through server controls.
● In comparison to HTML controls, it takes a long time to execute.
● These controls can be accessed from code-behind.
● Predefined classes exist for server controls.
● The name space System.Web.UI.WebControls is inherited by controls.
Types of server control:
Standard Controls
● Buttons, input fields, and labels etc.
Validation Controls
● RequiredFieldValidator
● RangeValidator
● RegularExpressionValidator
● CompareValidator
● CustomValidator
● ValidationSummary
Rich Controls
● Calendars, file upload, Ad-rotator, and multistep wizards etc.
Data Controls
● GridView, DetailView, FormView, ListView, Chart, etc.
Navigation Controls
● Menu, TreeView, SiteMapPath.
Login Controls
● Login, CreateUserWizard, LoginName, etc.
The Internet is the worldwide interconnection of hundreds of thousands of different types of computers that are connected to many networks. A web service is a defined technique for propagating messages between client and server applications on the World Wide Web. A web service is a software module that is designed to perform a set of specialised tasks. In cloud computing, web services can be found and invoked over the internet.
The client that invoked the web service would be able to receive functionality from the web service.
A web service is a collection of open protocols and standards that allow data to flow across different applications or systems. Web services can be used by software programmes written in a number of programming languages and running on a range of platforms to exchange data via computer networks like the Internet, much like inter-process communication on a single machine.
A web service is any software, application, or cloud technology that connects, interoperates, and exchanges data messages – often XML (Extensible Markup Language) – across the internet using standardised web protocols (HTTP or HTTPS).
Web services have the benefit of allowing programmes written in various languages to communicate with one another by sending data between clients and servers via a web service. A client makes an XML request to a web service, and the service responds with an XML response.
Fig 7: Web service
As seen in the diagram, Java,.net, and PHP programmes can connect with each other across the network via web services. The Java application, for example, can communicate with Java,.Net, and PHP applications. As a result, a web service is a language-independent communication method.
Features
● t can be accessed through the internet or intranet networks.
● A standardised XML communicating protocol.
● Independent of the operating system or programming language.
● It is self-descriptive when using the XML standard.
● It can be found using a simple locating method.
Components
XML + HTTP is the most fundamental web services platform. The following components are used by all typical web services:
● SOAP (Simple Object Access Protocol)
● UDDI (Universal Description, Discovery and Integration)
● WSDL (Web Services Description Language)
Working of web service
A web service uses open standards like HTML, XML, WSDL, and SOAP to allow communication between different applications. A web service relies on the assistance of
● XML to tag the data
● SOAP to transfer a message
● WSDL to describe the availability of service.
On Solaris, you can create a Java-based web service that can be accessed from your Windows Visual Basic programme.
You may also use C# to create new web services on Windows that can be called from your JavaServer Pages (JSP)-based web application running on Linux.
Key takeaway
A web service is a collection of open protocols and standards that allow data to flow across different applications or systems. Web services can be used by software programmes written in a number of programming languages and running on a range of platforms to exchange data via computer networks like the Internet, much like inter-process communication on a single machine.
Node.js is a cross-platform runtime environment for executing JavaScript code outside of a browser that is open-source. It's important to note that NodeJS is neither a framework nor a programming language. The majority of folks are perplexed and believe it is a framework or programming language. We frequently utilise Node.js to create back-end services such as APIs, Web Apps, and Mobile Apps. Large corporations like Paypal, Uber, Netflix, Walmart, and others use it in their production.
Features
There are various programming languages that can be used to create back-end services, therefore I'll describe what makes Node.js unique.
● It's simple to use and may be used for prototyping as well as agile development.
● It offers services that are both quick and scalable.
● Because it uses JavaScript everywhere, it's simple for a JavaScript programmer to use Node.js to create back-end services.
● Cleaner and more consistent source code.
● Open source libraries have a large ecosystem.
● It has Asynchronous or Non-blocking nature.
Advantages
Here are some of the advantages of utilising Node.js.
● Easy Scalability - Developers use Node.js because it allows them to effortlessly scale their applications in both horizontal and vertical orientations. During the application's scalability, we may also add more resources.
● Real-time web apps - You can design a web app with PHP or Node.js, and both will take the same amount of time. However, when it comes to building chat apps or gaming apps, Node.js is far more preferable due to faster synchronisation. For Node.js programming, the event loop also prevents HTTP overload.
● Fast Suite - NodeJs is powered by Google's V8 engine. Because NodeJs uses an event loop to handle all asynchronous actions, it functions like a fast suite, allowing all operations such as database reading and writing, network connections, and file system access to be completed swiftly.
● Easy to learn and code - Because NodeJs is based on JavaScript, it is simple to learn and programme. You can quickly learn and build the application using NodeJS if you are a front-end developer with a decent understanding of JavaScript.
● Caching's Benefits: It allows you to cache a single module. The first module is cached in the application memory whenever it is requested, so you don't have to re-execute the code.
● Data Streaming - The HTTP request and response are treated separately in NodeJs. They are data streams, therefore processing a file at the time of loading will lower the overall time and make the data presentation in the form of transmissions faster. You may also stream audio and video files at breakneck speeds.
Applications
NodeJS should be preferred to build:
● Real-Time Chats,
● Complex Single-Page applications,
● Real-time collaboration tools,
● Streaming apps
● JSON APIs based application
Key takeaway
Node.js is a cross-platform runtime environment for executing JavaScript code outside of a browser that is open-source. It's important to note that NodeJS is neither a framework nor a programming language. The majority of folks are perplexed and believe it is a framework or programming language. We frequently utilise Node.js to create back-end services such as APIs, Web Apps, and Mobile Apps. Large corporations like Paypal, Uber, Netflix, Walmart, and others use it in their production.
The project will be called complete-blog-php. Create a complete-blog-php folder in your server directory (htdocs or www). Open this folder on your preferred text editor, such as Sublime Text. Inside it, make the following subfolders: admin, includes, and static.
The following items will be stored in the three folders:
● admin: This folder will be used to store files for the admin backend. Posts, topics, and users can be created, viewed, updated, and deleted using these files.
● includes: This folder will hold files that include code that will be used on one or more other pages. E.g. Files for displaying errors.
● Static: files, such as pictures, CSS stylesheets, and Javascript, are stored here.
Create a file called index.php in the application's root folder:
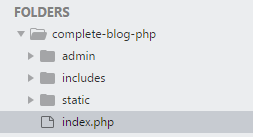
Copy and paste the following code into it:
<!DOCTYPE html>
<html>
<head>
<!-- Google Fonts -->
<link href="https://fonts.googleapis.com/css?family=Averia+Serif+Libre|Noto+Serif|Tangerine" rel="stylesheet">
<!-- Styling for public area -->
<link rel="stylesheet" href="static/css/public_styling.css">
<meta charset="UTF-8">
<title>LifeBlog | Home </title>
</head>
<body>
<!-- container - wraps whole page -->
<div class="container">
<!-- navbar -->
<div class="navbar">
<div class="logo_div">
<a href="index.php"><h1>LifeBlog</h1></a>
</div>
<ul>
<li><a class="active" href="index.php">Home</a></li>
<li><a href="#news">News</a></li>
<li><a href="#contact">Contact</a></li>
<li><a href="#about">About</a></li>
</ul>
</div>
<!-- // navbar -->
<!-- Page content -->
<div class="content">
<h2 class="content-title">Recent Articles</h2>
<hr>
<!-- more content still to come here ... -->
</div>
<!-- // Page content -->
<!-- footer -->
<div class="footer">
<p>MyViewers © <?php echo date('Y'); ?></p>
</div>
<!-- // footer -->
</div>
<!-- // container -->
</body>
</html>
We've placed links to some Google Fonts between the head>/head> tags. There's also a link to our public styling.css style file, which we'll make in a moment.
Also notice the container-classed div> element that wraps our entire application, including the navbar, page content, and footer elements of the page.
Go to http://localhost/complete-blog-php/index.php to see it in your browser.
Doesn't appear to be as cool as you'd like, does it?
As previously indicated, the static folder will house the site's styling, among other things. Inside the static folder, make three subfolders: css, images, and js. Create a file called public styling.css in the css subfolder you just made.
Add the following styling code to public styling.css:
/****************
*** DEFAULTS
*****************/
* { margin: 0px; padding: 0px; }
Html { height: 100%; box-sizing: border-box; }
Body {
Position: relative;
Margin: 0;
Padding-bottom: 6rem;
Min-height: 100%;
}
/* HEADINGS DEFAULT */
h1, h2, h3, h4, h5, h6 { color: #444; font-family: 'Averia Serif Libre', cursive; }
a { text-decoration: none; }
Ul, ol { margin-left: 40px; }
Hr { margin: 10px 0px; opacity: .25; }
/* FORM DEFAULTS */
Form h2 {
Margin: 25px auto;
Text-align: center;
Font-family: 'Averia Serif Libre', cursive;
}
Form input {
Width: 100%;
Display: block;
Padding: 13px 13px;
Font-size: 1em;
Margin: 5px auto 10px;
Border-radius: 3px;
Box-sizing : border-box;
Background: transparent;
Border: 1px solid #3E606F;
}
Form input:focus {
Outline: none;
}
/* BUTTON DEFAULT */
.btn {
Color: white;
Background: #4E6166;
Text-align: center;
Border: none;
Border-radius: 5px;
Display: block;
Letter-spacing: .1em;
Margin: 10px 0px;
Padding: 13px 20px;
Text-decoration: none;
}
.container {
Width: 80%;
Margin: 0px auto;
}
/* NAVBAR */
.navbar {
Margin: 0 auto;
Overflow: hidden;
Background-color: #3E606F;
Border-radius: 0px 0px 6px 6px;
}
.navbar ul {
List-style-type: none;
Float: right;
}
.navbar ul li {
Float: left;
Font-family: 'Noto Serif', serif;
}
.navbar ul li a {
Display: block;
Color: white;
Text-align: center;
Padding: 20px 28px;
Text-decoration: none;
}
.navbar ul li a:hover {
Color: #B9E6F2;
Background-color: #334F5C;
}
/* LOGO */
.navbar .logo_div {
Float: left;
Padding-top: 5px;
Padding-left: 40px;
}
.navbar .logo_div h1 {
Color: #B9E6F2;
Font-size: 3em;
Letter-spacing: 5px;
Font-weight: 100;
Font-family: 'Tangerine', cursive;
}
/* FOOTER */
.footer {
Position: absolute;
Right: 0;
Bottom: 0;
Left: 0;
Color: white;
Background-color: #73707D;
Text-align: center;
Width: 80%;
Margin: 20px auto 0px;
Padding: 20px 0px;
}
This code begins with the site's default styling, then moves on to the navbar and footer styling.
In your browser, reload the page. Our plain page now has a nice-looking navbar with a logo and some lovely fonts, and our footer is hidden someplace at the bottom if you scroll down. Great!
However, there are a few code segments on our page that will be replicated on many other pages of the website. Most pages, for example, will require a navbar and a footer, as well as connections to the head section's design and fonts. In PHP, we can create a piece of code in one file and include it in multiple other files at different locations. This is the same as writing the same code in those areas, with the added benefit of avoiding code repetition. We do this using the include or require keywords.
References:
- Jeffrey C.Jackson, "Web Technologies: A Computer Science Perspective", Second Edition, Pearson Education, 2007, ISBN 978-0131856035
- Xue Bai et al, “The web Warrior Guide to Web Programming”, Thomson, 2003.
- Marty Hall, Larry Brown, “Core Web Programming", Second Edition, Pearson Education, 2001, ISBN 978-0130897930.