Unit - 2
Abstract Data Types (ADTs) Arrays
An array is a collection of data items, all of the same type, accessed using a common name.
A one-dimensional array is like a list; A two dimensional array is like a table; The C language places no limits on the number of dimensions in an array, though specific implementations may.
Some texts refer to one-dimensional arrays as vectors, two-dimensional arrays as matrices, and use the general term arrays when the number of dimensions is unspecified or unimportant.
Single dimensional array
A one-dimensional array, often known as a single-dimensional array, is one in which a single subscript specification is required to identify a specific array element. We can declare a one-dimensional array as follows:-
Data_type array_name [Expression];
Where,
Data_type - The kind of element to be stored in the array is data type.
Array_name - array name specifies the array's name; it can be any type of name, much like other simple variables.
Expression - The number of values to be placed in the array is supplied; arrays are sometimes known as subscripted values; the subscript value must be an integer value, therefore the array's subscript begins at 0.
Example:
Int "a" [10]
Where int: data type
a: array name
10: expression
Output
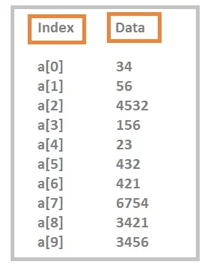
Data values are dummy values, you can understand after seeing the output, indexing starts from “0”.
Multidimensional Arrays
a 2D array can be defined as an array of arrays. The 2D array is organized as matrices which can be represented as the collection of rows and columns.
However, 2D arrays are created to implement a relational database look alike data structure. It provides ease of holding bulk data at once which can be passed to any number of functions wherever required.
How to declare 2D Array
The syntax of declaring a two dimensional array is very much similar to that of a one dimensional array, given as follows.
Int arr[max_rows][max_columns];
However, It produces the data structure which looks like the following.
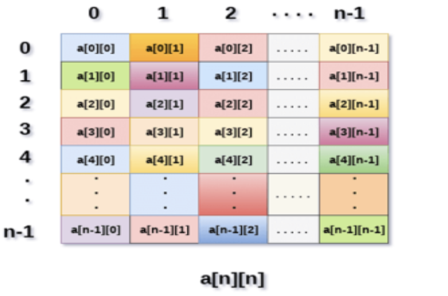
Fig 1: Example
Above image shows the two dimensional array, the elements are organized in the form of rows and columns. First element of the first row is represented by a[0][0] where the number shown in the first index is the number of that row while the number shown in the second index is the number of the column.
How do we access data in a 2D array
Due to the fact that the elements of 2D arrays can be random accessed. Similar to one dimensional arrays, we can access the individual cells in a 2D array by using the indices of the cells. There are two indices attached to a particular cell, one is its row number while the other is its column number.
However, we can store the value stored in any particular cell of a 2D array to some variable x by using the following syntax.
- Int x = a[i][j];
Where i and j is the row and column number of the cell respectively.
We can assign each cell of a 2D array to 0 by using the following code:
- For ( int i=0; i<n ;i++)
- {
- for (int j=0; j<n; j++)
- {
- a[i][j] = 0;
- }
- }
Initializing 2D Arrays
We know that, when we declare and initialize a one dimensional array in C programming simultaneously, we don't need to specify the size of the array. However this will not work with 2D arrays. We will have to define at least the second dimension of the array.
The syntax to declare and initialize the 2D array is given as follows.
- Int arr[2][2] = {0,1,2,3};
The number of elements that can be present in a 2D array will always be equal to (number of rows * number of columns).
Example: Storing User's data into a 2D array and printing it.
C Example:
- #include <stdio.h>
- Void main ()
- {
- int arr[3][3],i,j;
- for (i=0;i<3;i++)
- {
- for (j=0;j<3;j++)
- {
- printf("Enter a[%d][%d]: ",i,j);
- scanf("%d",&arr[i][j]);
- }
- }
- printf("\n printing the elements ....\n");
- for(i=0;i<3;i++)
- {
- printf("\n");
- for (j=0;j<3;j++)
- {
- printf("%d\t",arr[i][j]);
- }
- }
- }
Java Example
- Import java.util.Scanner;
- Public class TwoDArray {
- Public static void main(String[] args) {
- int[][] arr = new int[3][3];
- Scanner sc = new Scanner(System.in);
- for (inti =0;i<3;i++)
- {
- for(intj=0;j<3;j++)
- {
- System.out.print("Enter Element");
- arr[i][j]=sc.nextInt();
- System.out.println();
- }
- }
- System.out.println("Printing Elements...");
- for(inti=0;i<3;i++)
- {
- System.out.println();
- for(intj=0;j<3;j++)
- {
- System.out.print(arr[i][j]+"\t");
- }
- }
- }
- }
Mapping 2D array to 1D array
When it comes to map a 2 dimensional array, most of us might think that why this mapping is required. However, 2 D arrays exists from the user point of view. 2D arrays are created to implement a relational database table lookalike data structure, in computer memory, the storage technique for 2D array is similar to that of an one dimensional array.
The size of a two dimensional array is equal to the multiplication of number of rows and the number of columns present in the array. We do need to map two dimensional array to the one dimensional array in order to store them in the memory.
A 3 X 3 two dimensional array is shown in the following image. However, this array needs to be mapped to a one dimensional array in order to store it into the memory.
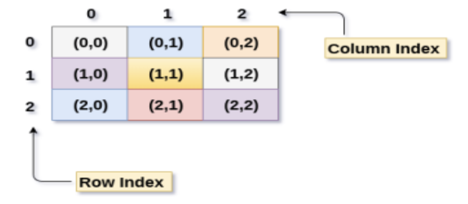
Fig 2: 3 X 3 two dimensional array
There are two main techniques of storing 2D array elements into memory
1. Row Major ordering
In row major ordering, all the rows of the 2D array are stored into the memory contiguously. Considering the array shown in the above image, its memory allocation according to row major order is shown as follows.

First, the 1st row of the array is stored into the memory completely, then the 2nd row of the array is stored into the memory completely and so on till the last row.
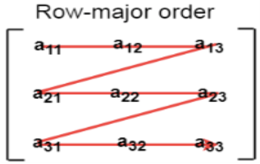
Fig 3: Row major ordering
2. Column Major ordering
According to the column major ordering, all the columns of the 2D array are stored into the memory contiguously. The memory allocation of the array which is shown in in the above image is given as follows.

First, the 1st column of the array is stored into the memory completely, then the 2nd row of the array is stored into the memory completely and so on till the last column of the array.
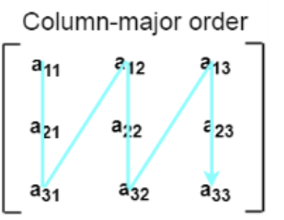
Fig 4: Column major ordering
Calculating the Address of the random element of a 2D array
Due to the fact that there are two different techniques of storing the two dimensional array into the memory, there are two different formulas to calculate the address of a random element of the 2D array.
By Row Major Order
If array is declared by a[m][n] where m is the number of rows while n is the number of columns, then address of an element a[i][j] of the array stored in row major order is calculated as,
- Address(a[i][j]) = B. A. + (i * n + j) * size
Where, B. A. Is the base address or the address of the first element of the array a[0][0]
Example:
- a[10...30, 55...75], base address of the array (BA) = 0, size of an element = 4 bytes .
- Find the location of a[15][68].
- Address(a[15][68]) = 0 +
- ((15 - 10) x (68 - 55 + 1) + (68 - 55)) x 4
- = (5 x 14 + 13) x 4
- = 83 x 4
- = 332 answer
By Column major order
If array is declared by a[m][n] where m is the number of rows while n is the number of columns, then address of an element a[i][j] of the array stored in row major order is calculated as,
- Address(a[i][j]) = ((j*m)+i)*Size + BA
Where BA is the base address of the array.
Example:
- A [-5 ... +20][20 ... 70], BA = 1020, Size of element = 8 bytes. Find the location of a[0][30].
- Address [A[0][30]) = ((30-20) x 24 + 5) x 8 + 1020 = 245 x 8 + 1020 = 2980 bytes
Key takeaway
- a 2D array can be defined as an array of arrays. The 2D array is organized as matrices which can be represented as the collection of rows and columns.
- However, 2D arrays are created to implement a relational database look alike data structure. It provides ease of holding bulk data at once which can be passed to any number of functions wherever required.
● Vectors and lists, which are fundamental parts of the C++ STL, are implemented using arrays.
● Stacks and queues are also implemented using arrays.
● Whenever possible, trees employ array implementation since arrays are easier to manage than pointers. Tress is then utilized to construct a variety of additional data structures.
● Arrays are used to implement matrices, which are an important aspect of every computer language's mathematics library.
● The graph's adjacency list is implemented using vectors, which are then implemented using arrays.
● Binary search trees and balanced binary trees, which can be built using arrays, are used in data structures such as a heap, map, and set.
● Multiple variables with the same name are stored in arrays.
● Arrays are used to develop CPU scheduling algorithms.
● Arrays are at the heart of all sorting algorithms.
A Stack is a linear data structure that follows the LIFO (Last-In-First-Out) principle. Stack has one end, whereas the Queue has two ends (front and rear). It contains only one pointer (top pointer) pointing to the topmost element of the stack. Whenever an element is added in the stack, it is added on the top of the stack, and the element can be deleted only from the stack. In other words, a stack can be defined as a container in which insertion and deletion can be done from the one end known as the top of the stack.
Some key points related to stack
● It is called as stack because it behaves like a real-world stack, piles of books, etc.
● A Stack is an abstract data type with a predefined capacity, which means that it can store the elements of a limited size.
● It is a data structure that follows some order to insert and delete the elements, and that order can be LIFO or FILO.
Stack Representation
A stack and its operations are depicted in the diagram below.
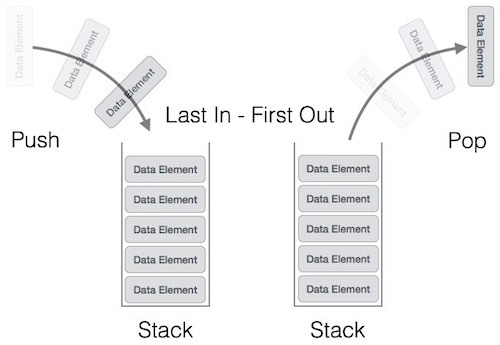
Array, Structure, Pointer, and Linked List can all be used to create a stack. A stack can be either fixed in size or dynamically resized. We'll use arrays to implement stack here, making it a fixed-size stack implementation.
PUSH operation
The steps involved in the PUSH operation is given below:
● Before inserting an element in a stack, we check whether the stack is full.
● If we try to insert the element in a stack, and the stack is full, then the overflow condition occurs.
● When we initialize a stack, we set the value of top as -1 to check that the stack is empty.
● When the new element is pushed in a stack, first, the value of the top gets incremented, i.e., top=top+1, and the element will be placed at the new position of the top.
● The elements will be inserted until we reach the max size of the stack.
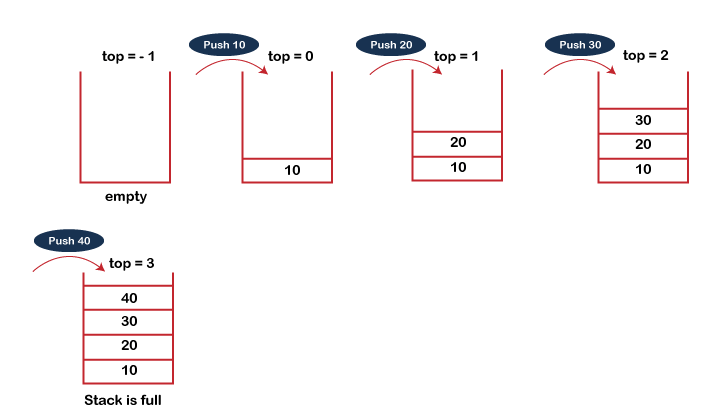
Fig 5: Push Operation Example
POP operation
The steps involved in the POP operation is given below:
● Before deleting the element from the stack, we check whether the stack is empty.
● If we try to delete the element from the empty stack, then the underflow condition occurs.
● If the stack is not empty, we first access the element which is pointed by the top
● Once the pop operation is performed, the top is decremented by 1, i.e., top=top-1.
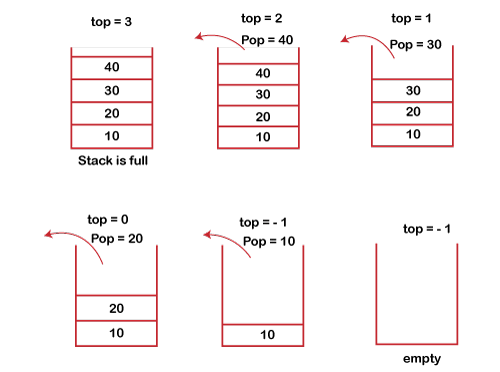
Fig 6: Pop Operation example
If we wish to execute a computation, frame a condition, or do anything else in a programming language, we employ a set of symbols to do it. An expression is made up of these symbols.
The following is an example of a phrase.
A value is represented by an expression, which is made up of operators and operands.
An operator, as defined above, is a symbol that performs a certain task, such as an arithmetic operation, a logical operation, or a conditional operation.
The operands are the values that the operators can use to complete the task. The operand can be a direct value, a variable, or a memory address.
Postfix expression
The operator is used after the operands in a postfix expression. "Operator follows the Operands," as the saying goes.
The following is the general structure of a Postfix expression...
Operand1 Operand2 Operator
Example

Prefix expression
Operator comes before operands in a prefix expression. "Operands follow the Operator," as the saying goes.
The following is the general structure of a Prefix expression.
Operator Operand1 Operand2
Example

Evaluation
The compiler prefers to evaluate an expression in its postfix form in Infix To Postfix Conversion Using Stack. The advantages of the postfix form include the deletion of parentheses, which indicate evaluation priority, as well as the elimination of the requirement to follow hierarchy, precedence, and associativity rules when evaluating the expression.
Because Postfix expressions have no parenthesis and may be evaluated as two operands and an operator at a time, the compiler and computer can handle them more easily.
A Postfix Expression's evaluation rule is as follows:
- While reading the expression from left to right, push the element in the stack if it is an operand.
- Pop the two operands from the stack, if the element is an operator and then evaluate it.
- Push back the result of the evaluation. Repeat it till the end of the expression.
Algorithm
1) Add ) to postfix expression.
2) Read postfix expression Left to Right until ) encountered
3) If operand is encountered, push it onto Stack
[End If]
4) If operator is encountered, Pop two elements
i) A -> Top element
Ii) B-> Next to Top element
Iii) Evaluate B operator A
Push B operator A onto Stack
5) Set result = pop
6) END
Example
Expression: 456*+
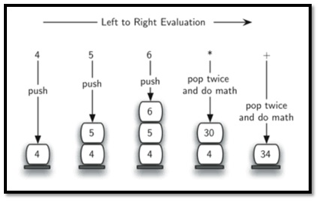
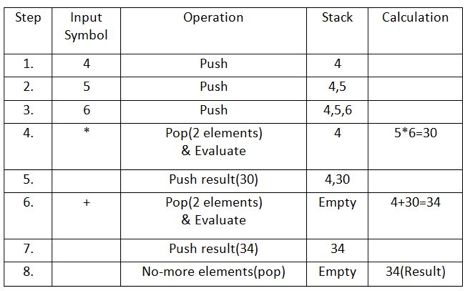
Result: 34
Key takeaway
- If we wish to execute a computation, frame a condition, or do anything else in a programming language, we employ a set of symbols to do it.
- An expression is made up of these symbols.
- The operator is used after the operands in a postfix expression. "Operator follows the Operands," as the saying goes.
- Operator comes before operands in a prefix expression. "Operands follow the Operator," as the saying goes.
When storing a big amount of data, a single stack is insufficient. We can use many stacks to solve this problem. We did this by using a single array with many stacks. Multiple stacks are created by dividing the array.
Assume an array STACK[n] is split into two stacks, STACK A and STACK B, with n = 10.
● STACK A extends from left to right, starting with the 0th element.
● STACK B extends from right to left, starting with the tenth piece.
● The total size of STACK A and STACK B is never greater than ten.

Multistack program in C
The following program demonstrates Multiple Stack -
#include <stdio.h>
#include <malloc.h>
#define MAX 10
Int stack[MAX], topA = -1, topB = MAX;
Void push_stackA(int val)
{
If(topA == topB-1)
Printf("\n STACK OVERFLOW");
Else
{
TopA+=1;
Stack[topA] = val;
}
}
Int pop_stackA()
{
Int val;
If(topA == -1)
{
Printf("\n STACK UNDERFLOW");
}
Else
{
Val = stack[topA];
TopA--;
}
Return val;
}
Void display_stackA()
{
Int i;
If(topA == -1)
Printf("\n Empty STACK A");
Else
{
For(i = topA;i >= 0;i--)
Printf("\t %d",stack[i]);
}
}
Void push_stackB(int val)
{
If(topB-1 == topA)
Printf("\n STACK OVERFLOW");
Else
{
TopB-=1;
Stack[topB] = val;
}
}
Int pop_stackB()
{
Int val;
If(topB == MAX)
{
Printf("\n STACK UNDERFLOW");
}
Else
{
Val = stack[topB];
TopB++;
}
}
Void display_stackB()
{
Int i;
If(topB == MAX)
Printf("\n Empty STACK B");
Else
{
For(i = topB; i < MAX;i++)
Printf("\t %d",stack[i]);
}
}
Int main()
{
Int option, val;
Do
{
Printf("\n -----Menu----- ");
Printf("\n Enter 1 to PUSH a element into STACK A");
Printf("\n Enter 2 to PUSH a element into STACK B");
Printf("\n Enter 3 to POP a element from STACK A");
Printf("\n Enter 4 to POP a element from STACK B");
Printf("\n Enter 5 to display the STACK A");
Printf("\n Enter 6 to display the STACK B");
Printf("\n Press 7 to exit");
Printf("\n Enter your choice: ");
Scanf("%d",&option);
Switch(option)
{
Case 1:
Printf("\n Enter a value to PUSH on STACK A :");
Scanf("%d",&val);
Push_stackA(val);
Break;
Case 2:
Printf("\n Enter the value to PUSH on STACK B:");
Scanf("%d", &val);
Push_stackB(val);
Break;
Case 3:
Printf("\n The value POPPED from STACK A = %d", val);
Pop_stackA();
Break;
Case 4:
Printf("\n The value POPPED from STACK B = %d", val);
Pop_stackB();
Break;
Case 5:
Printf("\n The STACK A elements are :\n");
Display_stackA();
Break;
Case 6:
Printf("\n The STACK B elements are :\n");
Display_stackB();
Break;
}
}while(option != 7);
Return 0;
}
Output
-----Menu-----
Enter 1 to PUSH a element into STACK A
Enter 2 to PUSH a element into STACK B
Enter 3 to POP a element from STACK A
Enter 4 to POP a element from STACK B
Enter 5 to display the STACK A
Enter 6 to display the STACK B
Press 7 to exit
Enter your choice: 1
Enter a value to PUSH on STACK A :10
-----Menu-----
Enter 1 to PUSH a element into STACK A
Enter 2 to PUSH a element into STACK B
Enter 3 to POP a element from STACK A
Enter 4 to POP a element from STACK B
Enter 5 to display the STACK A
Enter 6 to display the STACK B
Press 7 to exit
Enter your choice: 1
Enter a value to PUSH on STACK A :30
-----Menu-----
Enter 1 to PUSH a element into STACK A
Enter 2 to PUSH a element into STACK B
Enter 3 to POP a element from STACK A
Enter 4 to POP a element from STACK B
Enter 5 to display the STACK A
Enter 6 to display the STACK B
Press 7 to exit
Enter your choice: 1
Enter a value to PUSH on STACK A :20
-----Menu-----
Enter 1 to PUSH a element into STACK A
Enter 2 to PUSH a element into STACK B
Enter 3 to POP a element from STACK A
Enter 4 to POP a element from STACK B
Enter 5 to display the STACK A
Enter 6 to display the STACK B
Press 7 to exit
Enter your choice: 5
The STACK A elements are :
20 30 10
-----Menu-----
Enter 1 to PUSH a element into STACK A
Enter 2 to PUSH a element into STACK B
Enter 3 to POP a element from STACK A
Enter 4 to POP a element from STACK B
Enter 5 to display the STACK A
Enter 6 to display the STACK B
Press 7 to exit
Enter your choice: 3
The value POPPED from STACK A = 20
-----Menu-----
Enter 1 to PUSH a element into STACK A
Enter 2 to PUSH a element into STACK B
Enter 3 to POP a element from STACK A
Enter 4 to POP a element from STACK B
Enter 5 to display the STACK A
Enter 6 to display the STACK B
Press 7 to exit
Enter your choice: 5
The STACK A elements are :
30 10
-----Menu-----
Enter 1 to PUSH a element into STACK A
Enter 2 to PUSH a element into STACK B
Enter 3 to POP a element from STACK A
Enter 4 to POP a element from STACK B
Enter 5 to display the STACK A
Enter 6 to display the STACK B
Press 7 to exit
Enter your choice: 2
Enter the value to PUSH on STACK B:23
-----Menu-----
Enter 1 to PUSH a element into STACK A
Enter 2 to PUSH a element into STACK B
Enter 3 to POP a element from STACK A
Enter 4 to POP a element from STACK B
Enter 5 to display the STACK A
Enter 6 to display the STACK B
Press 7 to exit
Enter your choice: 6
The STACK B elements are :
24 23
-----Menu-----
Enter 1 to PUSH a element into STACK A
Enter 2 to PUSH a element into STACK B
Enter 3 to POP a element from STACK A
Enter 4 to POP a element from STACK B
Enter 5 to display the STACK A
Enter 6 to display the STACK B
Press 7 to exit
Enter your choice: 4
The value POPPED from STACK B = 24
-----Menu-----
Enter 1 to PUSH a element into STACK A
Enter 2 to PUSH a element into STACK B
Enter 3 to POP a element from STACK A
Enter 4 to POP a element from STACK B
Enter 5 to display the STACK A
Enter 6 to display the STACK B
Press 7 to exit
Enter your choice:
A queue is an ordered list that allows insert operations to be done at one end (REAR) and delete operations to be performed at the other end (FRONT). The First In First Out list is referred to as a queue.
For example, create a queue, People in line for a train ticket.
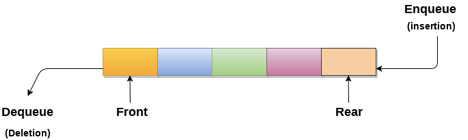
Fig 7: Queue
Operation on queue
● Add (Enqueue) - The enqueue action is used to add the element to the queue's backend. It gives a void result.
● Delete (Dequeue) - The dequeue operation is used to remove items from the queue's front end. It also returns the front-end element that has been removed. It gives you an integer value as a result. It's also possible to make the dequeue operation void.
● Full (queue overflow) - When the Queue is totally full, the overflow condition appears.
● Empty (queue underflow) - The underflow condition is thrown when the Queue is empty, that is, when there are no elements in the Queue.
Applications of Queue
Because the queue conducts operations on a first-in-first-out basis, the ordering of actions is relatively fair. Queues are used in a variety of ways, as seen below.
● Queues are commonly used as queues for a single shared resource such as a printer, disc, or CPU.
● Pipes, file IO, and sockets all employ queues for asynchronous data transfer (when data is not transferred at the same pace between two processes).
● Most programmes, such as MP3 media players and CD players, use queues as buffers.
● Queues are used to manage the play list in media players, allowing users to add and remove music.
● In operating systems, queues are used to handle interrupts.
Insertion and Deletion in Queue
Insertion operation
By adding an element to the end of the queue, the insert operation appends it. The new element will be the queue's last element.
To begin, use the following line to allocate memory for the new node ptr.
Ptr = (struct node *) malloc (sizeof(struct node));
There are two possible scenarios for adding this new node ptr to the connected queue.
We inject an element into an empty queue in the first scenario. The condition front = NULL gets true in this scenario.
The queue in the second scenario has more than one element. The condition front = NULL is no longer true. We need to change the end pointer rear in this case such that the next pointer of rear points to the new node ptr. Because this is a linked queue, the rear pointer must also point to the newly inserted node ptr. We must additionally set the rear pointer's next pointer to NULL.
Algorithm
● Step 1: Allocate the space for the new node PTR
● Step 2: SET PTR -> DATA = VAL
● Step 3: IF FRONT = NULL
SET FRONT = REAR = PTR
SET FRONT -> NEXT = REAR -> NEXT = NULL
ELSE
SET REAR -> NEXT = PTR
SET REAR = PTR
SET REAR -> NEXT = NULL
[END OF IF]
● Step 4: END
C function
Void insert(struct node *ptr, int item; )
{
ptr = (struct node *) malloc (sizeof(struct node));
if(ptr == NULL)
{
printf("\nOVERFLOW\n");
return;
}
else
{
ptr -> data = item;
if(front == NULL)
{
front = ptr;
rear = ptr;
front -> next = NULL;
rear -> next = NULL;
}
else
{
rear -> next = ptr;
rear = ptr;
rear->next = NULL;
}
}
}
Deletion
The deletion action removes the initial inserted element from all queue elements. To begin, we must determine whether the list is empty or not. If the list is empty, the condition front == NULL becomes true; in this case, we simply write underflow on the console and quit.
Otherwise, the element pointed by the pointer front will be deleted. Copy the node pointed by the front pointer into the pointer ptr for this purpose. Shift the front pointer to the next node and release the node referenced by node ptr. The following statements are used to do this.
Algorithm
● Step 1: IF FRONT = NULL
Write " Underflow "
Go to Step 5
[END OF IF]
● Step 2: SET PTR = FRONT
● Step 3: SET FRONT = FRONT -> NEXT
● Step 4: FREE PTR
● Step 5: END
C function
Void delete (struct node *ptr)
{
if(front == NULL)
{
printf("\nUNDERFLOW\n");
return;
}
else
{
ptr = front;
front = front -> next;
free(ptr);
}
}
Key takeaway
- A queue is an ordered list that allows insert operations to be done at one end (REAR) and delete operations to be performed at the other end (FRONT).
- The First In First Out list is referred to as a queue.
- In a queue, the front and back variables indicate the location from which insertions and deletions are made.
Why was the concept of the circular queue introduced?
There was one limitation in the array implementation of Queue. If the rear reaches to the end position of the Queue then there might be the possibility that some vacant spaces are left in the beginning which cannot be utilized. So, to overcome such limitations, the concept of the circular queue was introduced.
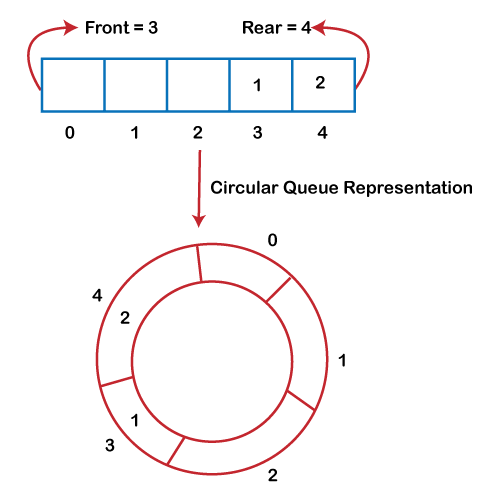
Fig 8: Circular queue
As we can see in the above image, the rear is at the last position of the Queue and the front is pointing somewhere rather than the 0th position. In the above array, there are only two elements and the other three positions are empty. The rear is at the last position of the Queue; if we try to insert the element then it will show that there are no empty spaces in the Queue. There is one solution to avoid such wastage of memory space by shifting both the elements at the left and adjust the front and rear end accordingly. It is not a practically good approach because shifting all the elements will consume lots of time. The efficient approach to avoid the wastage of the memory is to use the circular queue data structure.
What is a Circular Queue?
A circular queue is similar to a linear queue as it is also based on the FIFO (First In First Out) principle except that the last position is connected to the first position in a circular queue that forms a circle. It is also known as a Ring Buffer.
Operations on Circular Queue
The following are the operations that can be performed on a circular queue:
● Front: It is used to get the front element from the Queue.
● Rear: It is used to get the rear element from the Queue.
● enQueue(value): This function is used to insert the new value in the Queue. The new element is always inserted from the rear end.
● deQueue(): This function deletes an element from the Queue. The deletion in a Queue always takes place from the front end.
Applications of Circular Queue
The circular Queue can be used in the following scenarios:
● Memory management: The circular queue provides memory management. As we have already seen in the linear queue, the memory is not managed very efficiently. But in case of a circular queue, the memory is managed efficiently by placing the elements in a location which is unused.
● CPU Scheduling: The operating system also uses the circular queue to insert the processes and then execute them.
● Traffic system: In a computer-control traffic system, traffic lights are one of the best examples of the circular queue. Each traffic light gets ON one by one after every interval of time. Like red light gets ON for one minute then yellow light for one minute and then green light. After the green light, the red light gets ON.
Key takeaway
- A circular queue is similar to a linear queue as it is also based on the FIFO (First In First Out) principle except that the last position is connected to the first position in a circular queue that forms a circle.
- It is also known as a Ring Buffer.
What is a priority queue?
A priority queue is an abstract data type that behaves similarly to the normal queue except that each element has some priority, i.e., the element with the highest priority would come first in a priority queue. The priority of the elements in a priority queue will determine the order in which elements are removed from the priority queue.
The priority queue supports only comparable elements, which means that the elements are either arranged in an ascending or descending order.
For example, suppose we have some values like 1, 3, 4, 8, 14, 22 inserted in a priority queue with an ordering imposed on the values from least to the greatest. Therefore, the 1 number would be having the highest priority while 22 will be having the lowest priority.
Characteristics of a Priority queue
A priority queue is an extension of a queue that contains the following characteristics:
● Every element in a priority queue has some priority associated with it.
● An element with the higher priority will be deleted before the deletion of the lesser priority.
● If two elements in a priority queue have the same priority, they will be arranged using the FIFO principle.
Let's understand the priority queue through an example.
We have a priority queue that contains the following values:
1, 3, 4, 8, 14, 22
All the values are arranged in ascending order. Now, we will observe how the priority queue will look after performing the following operations:
● poll(): This function will remove the highest priority element from the priority queue. In the above priority queue, the '1' element has the highest priority, so it will be removed from the priority queue.
● add(2): This function will insert the '2' element in a priority queue. As 2 is the smallest element among all the numbers so it will obtain the highest priority.
● poll(): It will remove the '2' element from the priority queue as it has the highest priority queue.
● add(5): It will insert 5 elements after 4 as 5 is larger than 4 and lesser than 8, so it will obtain the third highest priority in a priority queue.
Types of Priority Queue
There are two types of priority queue:
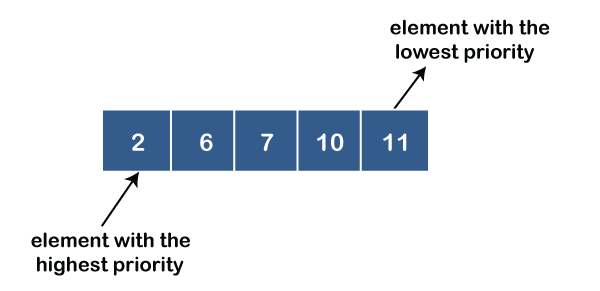
● Ascending order priority queue: In ascending order priority queue, a lower priority number is given as a higher priority in a priority. For example, we take the numbers from 1 to 5 arranged in an ascending order like 1,2,3,4,5; therefore, the smallest number, i.e., 1 is given as the highest priority in a priority queue.
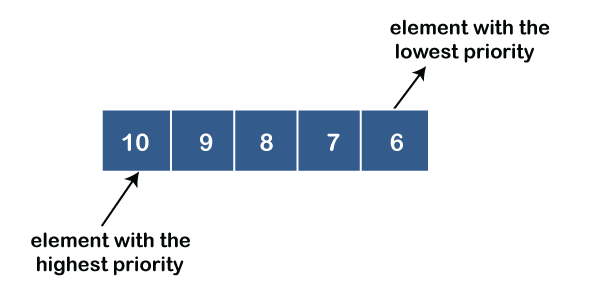
● Descending order priority queue: In descending order priority queue, a higher priority number is given as a higher priority in a priority. For example, we take the numbers from 1 to 5 arranged in descending order like 5, 4, 3, 2, 1; therefore, the largest number, i.e., 5 is given as the highest priority in a priority queue.
Representation of priority queue
Now, we will see how to represent the priority queue through a one-way list.
We will create the priority queue by using the list given below in which INFO list contains the data elements, PRN list contains the priority numbers of each data element available in the INFO list, and LINK basically contains the address of the next node.
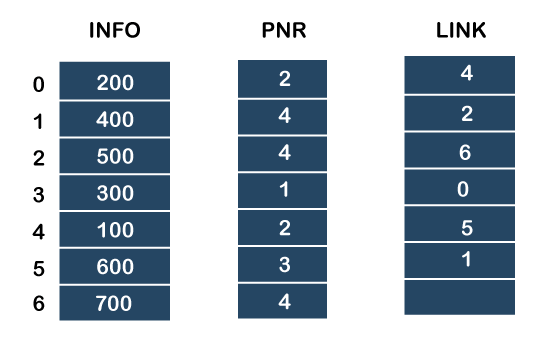
Let's create the priority queue step by step.
In the case of priority queue, lower priority number is considered the higher priority, i.e., lower priority number = higher priority.
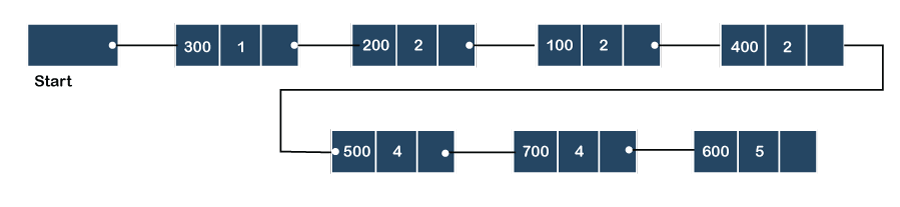
Step 1: In the list, lower priority number is 1, whose data value is 333, so it will be inserted in the list as shown in the below diagram:
Step 2: After inserting 333, priority number 2 is having a higher priority, and data values associated with this priority are 222 and 111. So, this data will be inserted based on the FIFO principle; therefore 222 will be added first and then 111.
Step 3: After inserting the elements of priority 2, the next higher priority number is 4 and data elements associated with 4 priority numbers are 444, 555, 777. In this case, elements would be inserted based on the FIFO principle; therefore, 444 will be added first, then 555, and then 777.
Step 4: After inserting the elements of priority 4, the next higher priority number is 5, and the value associated with priority 5 is 666, so it will be inserted at the end of the queue.
Implementation of Priority Queue
The priority queue can be implemented in four ways that include arrays, linked list, heap data structure and binary search tree. The heap data structure is the most efficient way of implementing the priority queue, so we will implement the priority queue using a heap data structure in this topic. Now, first we understand the reason why heap is the most efficient way among all the other data structures.
Key takeaway
- The dequeue stands for Double Ended Queue.
- In the queue, the insertion takes place from one end while the deletion takes place from another end.
- The input-restricted queue means that some restrictions are applied to the insertion.
- The output-restricted queue means that some restrictions are applied to the deletion operation.
References:
- Data structures and Algorithm Analysis in C, 2nd edition, M.A.Weiss, Pearson
- Fundamentals of Computer Algorithms by Horowitz, Sahni,Galgotia Pub. 2001 ed.
- “Algorithms, Data Structuresand Problem Solving with C++”, Illustrated Edition by Mark Allen Weiss, Addison-Wesley Publishing Company.
- Introduction to Algorithms, by Thomas Corman III edition, PHI